|
In honor of Halloween, I thought I'd talk a bit more about GHOST notes...spooky right?? (as always, I'm hilarious). Anyways, I've explained ghost notes before (for example, here...about halfway down the post) - I use them to remove strums from my playing, while keeping my hand moving in the "bum-ditty" motion. To play a ghost note, strike past the strings without hitting them; "bum-ditty" instantly turns into "bum-___ty," giving you a little more space in your tunes...nifty trick!
At some point in my banjo experimentation, I had the following thought: a lot of people play with constant (or near constant) double thumbing (i.e. they put a 5th string pull on every up-beat, creating a "bump-a-ditty" pattern); what would constant ghost-noting and double thumbing sound like together? The basic pattern of what I'm talking about would look something like this: 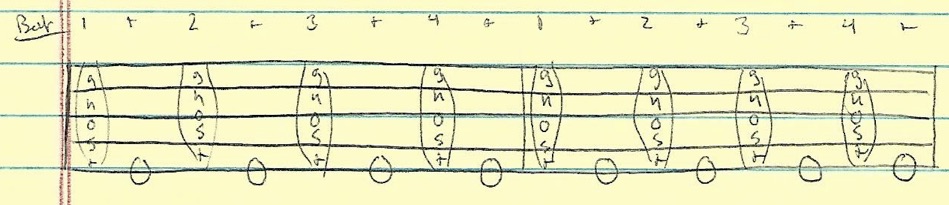
Figure 1 - Constant ghost-noting and double-thumbing. As you can tell, I got a new batch of yellow legal pads....not sure how I feel about them yet.
Playing Figure 1 poses the following conundrum, however: though you're "playing" ghost notes on the down-beats (i.e. whole numbers) and playing 5th string pulls on the up-beats (i.e. "and" beats marked by a "+" above), its a little hard for the listener to tell the difference between up-beats and down-beats without context. That is, the listener's brain could easily assume that the 5th string pulls are the down-beats when hearing Figure 1 played out loud; this could create some confusion when putting this idea into a tune (...which is, after all, the eventual goal). While messing with listener expectations about the beat may be fun in an experimental music context, I like to be a little more heavy-handed about defining the beat in Old-Time. Therefore, I'll amend this idea by putting a strong note on the down-beat at the beginning of each measure like so:
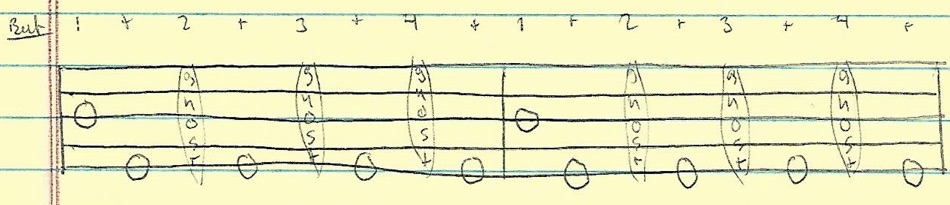
Figure 2 - Nearly constant ghost-noting and double-thumbing.
Just as clawhammer players often fit fiddle tunes to "bum-ditty" or "bump-a-ditty" patterns, we could use the "bump-a-___ty,___-a-___-ty" pattern above to permeate a fiddle tune as well. To show what I'm talking about I'll borrow a few examples from my "27 ways to play spotted pony" post (here). Lets start with a Bum-ditty approach:

Figure 3 (aka Figure 1 from the "Spotted Pony" post) - Standard bum-ditty approach to playing the A-part walkup in "Spotted Pony."
Figure 3 shows how clawhammer banjo players typically play the first 2 measures (a.k.a. the A-part walkup) of "Spotted Pony." The most basic form of the melody for the A-part walkup consists of just the notes that occur on beats 1 and 3 of each measure; basically you can think of it as the first 4 notes of a D major scale played as half-notes. As clawhammer players, we would rarely play just those notes however; we can't help but use the magic of clawhammer to back the melody by "filling in the blanks" around the melody notes and creating some rhythmic drive. As indicated above, Figure 1 fills in those blanks using the typical "bum-ditty" approach, with the melody notes occurring on the "bum's" of the "bum-ditty" pattern.
Even though the melody to "Spotted Pony" does not continue to be this sparse throughout the tune, you can use the "bum-ditty" approach to fill in the blanks of the notier parts of the melody as well, thereby creating a "bum-ditty" arrangement for the whole tune. To write a tab of this type of arrangement, you would first write in all the melody notes, using your index/middle finger to play notes on the down-beats, and hammer-on's, pull-off's, or drop-thumb's to play notes on the up-beats. Once the melody is finished, there will still be a lot of space in the tune and you can use Figure 1 as a guideline of how to "fill in the blanks;" if you have a "2" or "4" beat empty, put in a strum in your tab using whatever chord is occurring at the moment; similarly, if you have a "2+" or "4+" beat (i.e. the up-beats that follow the 2nd and 4th beats) empty, put a 5th string pull in your tab. Note: this is a really good exercise for anyone thats never made their own clawhammer arrangement of a tune. Some people find the constant "bum-ditty" approach outlined above kind of boring, but I'll admit that I've gotten a lot of mileage out of it and it was my default mode for making clawhammer arrangements of fiddle tunes for a long time. If you go through the above exercise of making a "bum-ditty" arrangement of an entire tune, you'll see that in the notier parts of a melody you likely play no strums or 5th string pulls; as the melody calms down a bit, 5th string pulls come back in at regular intervals; regular strums only make it back in at the most melodically-sparse moments. If we stick with a single rhythmic idea like the "bum-ditty" through an entire tune, the listener hears the "bum-ditty" as constant throughout, despite these changes in how much rhythm we are playing. Done just right, we can create the illusion that a second banjo is actually playing the bum-ditty rhythm in the background of our melodic playing - the idea of playing simultaneous melody and rhythm is what I found so exciting about clawhammer banjo in the first place! Lets look at the "bump-a-ditty" approach (aka "constant double thumbing") next: 
Figure 4 (aka Figure 6 from the "Spotted Pony" post) - Constant double-thumbing "bump-a-ditty" approach to playing the A-part walkup in "Spotted Pony."
As advertised, there is a 5th string pull on every up-beat in Figure 4. I never really got into this style for my own playing, but I heard a lot of it at Clifftop this year, and I'll admit that constant 5th string pulls can really drive a jam forward! In the case of Figure 4, rather than adding in strums, I simply repeated melody notes on the 2nd and 4th beats of each measure.....but strums could work as well. Making a tab for a whole tune using the "bump-a-ditty" approach is fairly straightforward since there are no down-beats or up-beats devoid of notes! Start by writing out your melody notes as we did with the "bum-ditty" approach, then fill any empty down-beats with either notes or strums, and fill any empty up-beats with 5th string pulls. Once again, if done well, you can create the illusion that a 2nd banjo player is constantly playing the type of rhythm outlined in Figure 4, while you play the melody!
Finally, on to the "bump-a-__ty-___-a-___ty" approach from Figure 2. Here's this approach applied to the A-part walkup for "Spotted Pony:" 
Figure 5 (aka Figure 10 from the "Spotted Pony" post) - Constant ghost noting and double-thumbing on the A-part walkup in "Spotted Pony"
As you can see, even with the sparse melody from the A-part walkup in "Spotted Pony," we had to add a melody note in the center of the "bump-a-___ty-___-a-___ty" pattern outlined in Figure 2....essentially turning it in to a "bump-a-___ty-bump-a-___ty" pattern. While we could easily follow the same procedure for structuring fiddle tunes around this pattern as we did for the "bum-ditty" and "bump-a-ditty" patterns above, all of the space created by the ghost notes is quickly eaten up by melody in most old time tunes; the 5th string pulls that remain don't easily allow this pattern to be differentiated from the "bump-a-ditty" pattern outlined in Figure 4.
In other words, as much as I love this pattern, it really only works in tunes with a lot of melodic space...we just need the perfect tune... Using the "bump-a-___ty-___-a-___ty" pattern effectively in "Yew Piney Mountain" "Yew Piney Mountain" is my go-to example of a weird West Virginia fiddle tune (believe me, I'm using "weird" as high praise in this case). Every fiddler's version is just a bit different and can run the gamut from square (or mostly square) to extremely crooked. Of all the haunting versions I've heard, my hands down favorite, is Chance McCoy's.version on his album "Debut" (check out my post about this and other great "New Old Time" albums here). This mesmerizing version is played on solo 5-string fiddle (equipped with a low C string) and its replete with pauses that keep the listener on their toes; honestly its kind of hard to even hum properly! I always thought that a well-executed, similarly-breathy, solo clawhammer version of this piece could win me the banjo contest at Clifftop...but I was a little too nervous to pull it out of my sleeve on stage this year and settled for a safer version of the Henry Reed tune "Shoes and Stockings" instead (sadly, this didn't get me in the finals : ). In my current arrangement of "Yew Piney Mountain" (sudio and tab below) I use the "bump-a-___ty-___-a-___ty" pattern to preserve the feel of space in the tune without actually having to stop the movement of my right hand entirely. As in Chance McCoy's version, bursts of melody kind of jump out of the surrounding quiet (....or at least, thats the goal : ), though once again, my "quiet" is filled with 5th string pulls. To bring the contrast home, I play the 5th string pulls lighter than the melody notes and try to give the impression that they are constant throughout the tune.
My highly-crooked version of "Yew Piney Mountain" for solo banjo as inspired by Chance McCoy's solo fiddle version; played on my Buckeye (see here) pre-tone ring addition.
As promised, I've written up a tab as well:
Writing up a tab for this was an interesting process - I came up with the banjo arrangement without pen and paper and I had a hard time picking out things that my hand already knew how to do. For instance, I had difficulty counting how many 5th string pulls occurred in each pause, though my right hand could do it subconsciously; playing music is more feeling than thinking sometimes : ) I also "learned" the structure of this tune by making a tab...and its quite crooked in the sense that there are uneven numbers of measures and a few half-length measures interspersed. In the Milliner-Koken book of American Fiddle Tunes (which is both an incredible resource and the physically-largest but I own), Claire Milliner and Walt Koken decided against adding measures in to their transcriptions of the playing of traditional fiddlers.....and I now understand why!
A couple more notes on the above tab: obviously its not an exhaustive account of the audio file above. The tab is the most basic version of what I play, but I do have a lot of variations (including one A part variation where I fret the 5th string!) in the audio file - just kind of a lot of effort to write them all out, and the tab is good jumping-off point : ) Secondly, you'll notice that the "bump-a-___ty-___-a-___ty" pattern is often extended to "bump-a-___ty-___-a-___ty___-a-___ty" between melodic phrases, or even "bump-a-___ty-___-a-___ty___-a-___ty___-a-___ty" in the case of the "potatoes" before the tune. As aforementioned, I like to provide some "down-beat context notes" in this pattern, but I don't mind extending the periods between context notes in this tune. As always, I hope these ideas help you with your own playing...but please don't steal my arrangement until after I've gotten the nerve to try it out on the Clifftop stage : ) While I'm a little dubious about having invented something truly unique here, I'll admit I've never heard anyone play as many as 6 uninterrupted up-beat 5th string pulls in a row (as happens several times in the tab above). I should mention that some classic round peak players roll Galax licks into 2 or 3 down-beat 5th string pulls and Mark Johnson (The Clawgrass guy, who I got to meet at Midwest banjo camp a few years back) frequently employs a Galax lick that ends in a down-beat 5th string pull followed by 2 up-beat 5th string pulls, which, I'll admit, gave me the starting point for continuous up-beat 5th string pulls as a way to fill space... In the spirit of the season, I'll end with a picture of my Jack-o-Lantern this year: 
Banjo Jack-o-Lantern (Banj-o-Lantern??) - Happy Halloween!
3 Comments
In last week's post, devoted to the inaugural gig of the Sigogglin' Stringband (here), I frequently referenced the mysterious "El Hefe," my go-to banjo for C and G tunes at the K'zoo square dance. This week I decided it was high time for El Hefe to get a bit of time in the spotlight; after all, my Buckeye did get a whole post to itself (here), doesn't El Hefe deserve the same? Undoubtedly...so here we go! El Hefe will always have a special place in my banjo quiver, because I actually built it (note: I decided against "him" as El Hefe's pronoun to avoid going any further down the pathway of instrument anthropomorphizing....) in a workshop run by the guys at Pisgah banjos (www.pigsahbanjos.com) this past January. The workshop was conducted at John C. Campbell folk school in Brasstown NC and it was just an amazing experience: In one week, with little previous woodworking experience, I walked away with not just a playable, but exceptional, banjo. Also, I got to know Patrick and Adam from Pisgah Banjos, along with several other people in the workshop including Jeff Johnston, a civil engineer from New Mexico who thankfully took a bunch of pictures during the construction process that he's given me permission to share (below). Note - I'll refer to him as "JJ" to avoid sounding like I'm writing about myself in the 3rd person : ) Building a banjo! I could go on and on about the workshop, but there are a lot of Pisgah workshop reviews (particularly on banjo hangout), and this post is supposed to be about El Hefe - so I'll just go through some photo highlights in roughly chronological order below. It should be noted that Patrick has been conducting workshops every ~6 months for the past couple years, sometimes at JCCFS, sometimes at Warren Wilson college; if you'd like to build a banjo of your own, I'd urge you to contact him and find out when the next one is coming! 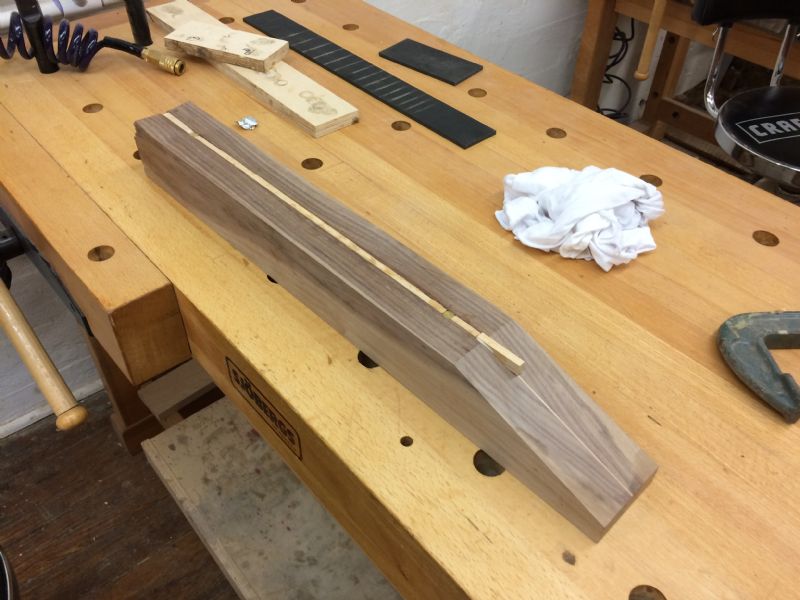 Starting at the beginning (pic courtesy of JJ) - Each of us was given a pre-glued 3-piece neck blank. The area at the heel was already cut to fit the pot, the headstock angle was already cut, and the truss rod slot was already cut. It would have been nice to start from unglued wood so that we could learn all of these steps (particularly the neck to pot fit, which is hyper important in my opinion) but hey, we only had a week. Here you can see what JJ's neck looked like after putting in the truss rod and gluing in the truss-rod cover. 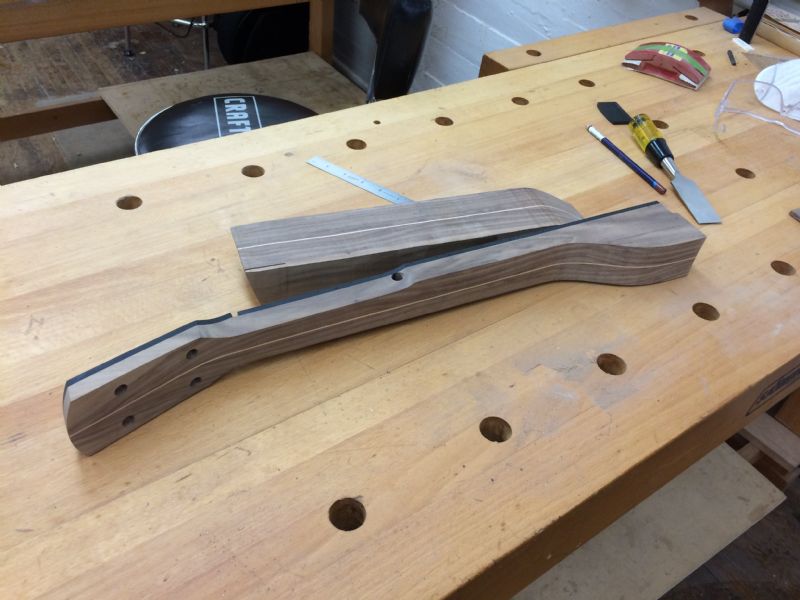 Rough cut neck (pic courtesy of JJ) - Since the last pic, JJ has glued on his pre-fret-slotted richlite fingerboard, rough cut the neck on the band saw, and drilled holes for the tuners. Notice the other big piece of wood - this was cut away from the back of the neck; eventually, we shaved these pieces down to make the dowel stick! 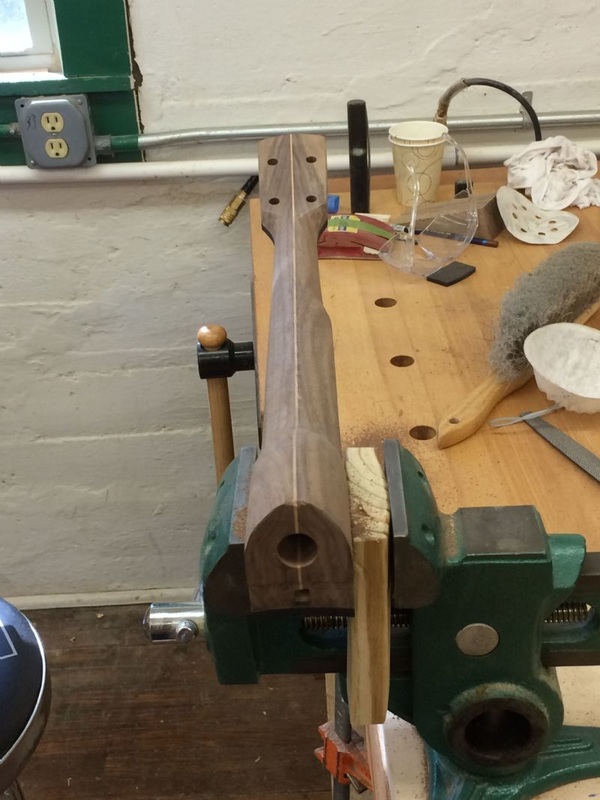 Neck after shaping (pic courtesy of JJ) - Between the last pic and this one was a LOT of rasping and sanding. It was pretty rewarding to see a banjo neck emerge! Note that the dowel stick hole is cut as well - believe it or not we did this with a carefully aimed hand drill....and it ended up working out surprisingly well! 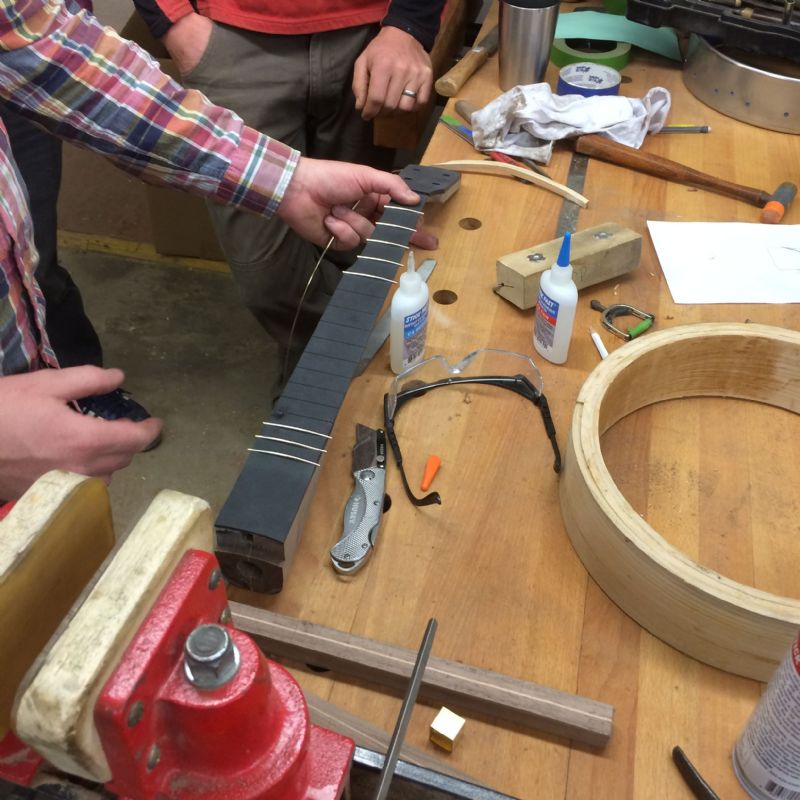 Fretting demo (pic courtesy of JJ) - The hands you see are those of Patrick, who owns Pisgah banjos, and Adam (in the background) who works at Pisgah, and plays a sweet version of "Whiteface" : ) You can also see a rim blank to the right of the picture; we did a demo of bending and gluing these but I didn't get to actually bend "El Hefe's" rim due to time constraints. We did get to trim rims down to size and smooth them out on the lathe however. 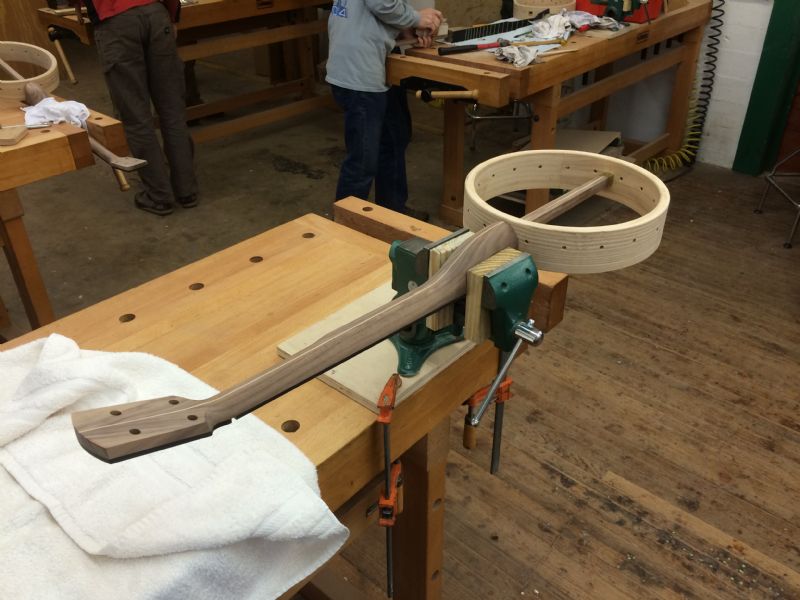 Rough fitting (pic courtesy of JJ) - We had to make sure our parts fit together prior to staining and finishing. This is JJ's banjo, which he named "Brasstown Belle." You can see the holes for shoes drilled in the rim here as well. 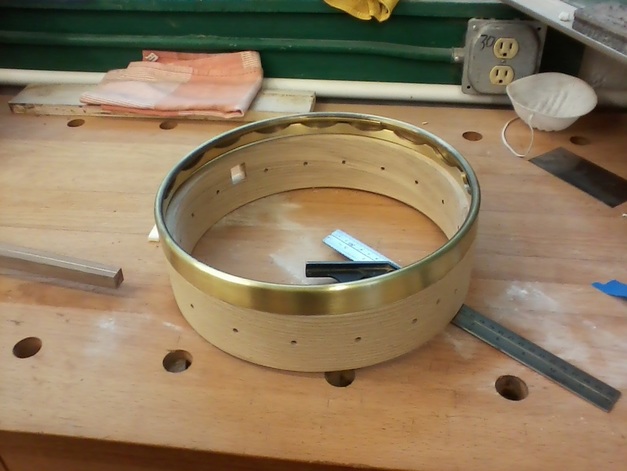 El Hefe's pot (pic courtesy of my flip-phone...oh yeah, I still rock a flip-phone) - While most people built a banjo very similar to Pisgah's "Woodchuck" model, you may be able to tell that I took a bit of a left turn in specs....more on that later : ) A note here: Patrick has routinely reminded us that we did not build a "Pisgah" banjo, but rather a "Pisgah-esque" banjo. 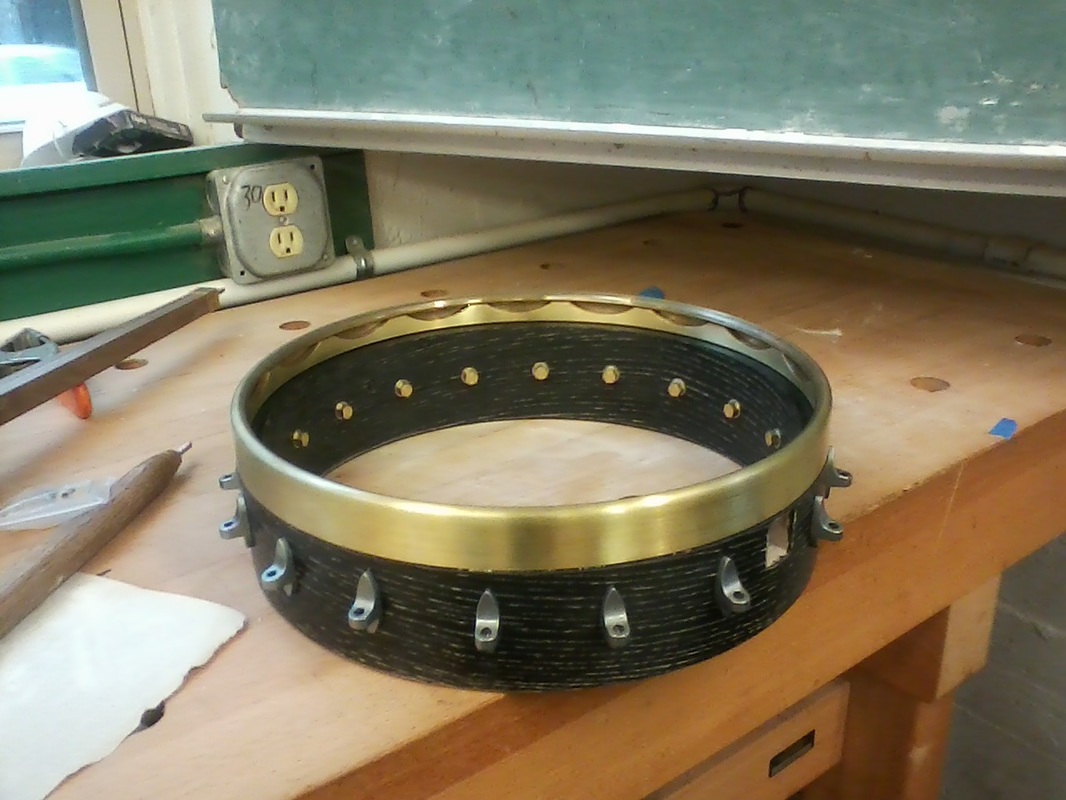 El Hefe's rim post staining (once again, flip phone pic) - My buddy Lindsey, a classmate with a background in woodworking, was responsible for the awesome finish! We created the stripey pattern by rough sanding the rim (thereby leaving some grain raised), staining it black, then putting the newly-stained rim on the lathe and sanding down the raised grain further to expose the color underneath....freaking sweet! 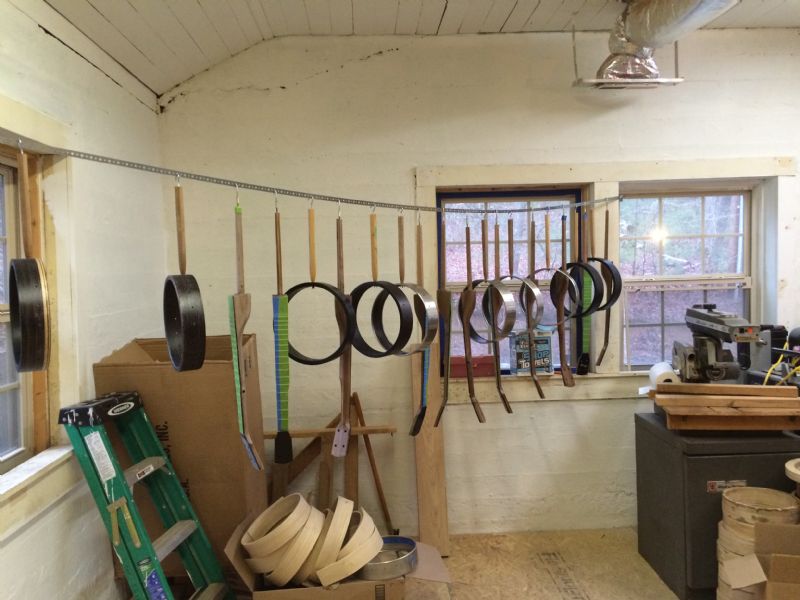 Banjos drying after staining (pic courtesy of JJ) - As you can see, a couple people chose to make spun over banjos similar to Pisgah's "Rambler" model; there is a wood lamination inside of those rims that had to be stained (obviously the stainless steel outside was not stained). 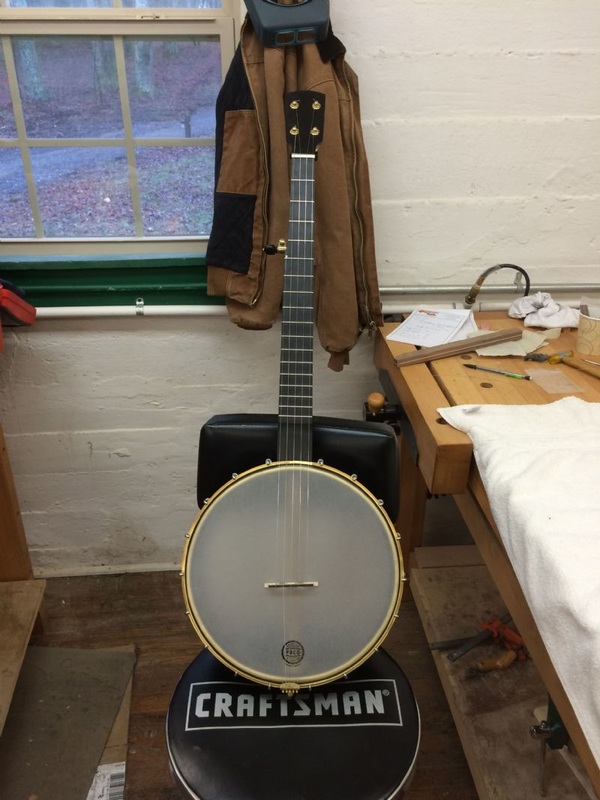 Brasstown Belle all finished (pic courtesy of JJ) - I thought I'd put JJ's banjo up for you to look at - just beautiful! I got to play this banjo and really liked the sound as well! You'll see El Hefe at the end of this post. El Hefe's Specs: I've been a little cagey about El Hefe's specs until now (though some are obvious in the pics above) so that I could talk about them all at once: In my post on the Buckeye, I identified eight specs to pay attention to when buying a banjo: Scale length, truss rod, fret size, rim depth, rim thickness, number of hooks, head type, and tone ring; I'll rehash these decisions in relation to El Hefe below. I didn't get a choice about 2 other specs on the Buckeye since the neck was already done: rim dimeter and wood choice - I'll add these on the list below. While I didn't get to pick all of these specs, I did get a say on a few of them....mostly because I emailed Patrick beforehand and asked whether or not they could be incorporated in the design. What I didn't realize was that Patrick finds it easier to have everyone build the same banjo; since I was the only one asking about certain specs, everyone in the workshop ended up making something close to the banjo that I wanted to make (particularly in regard to pot diameter and scale length) - sorry guys : ) El Hefe spec rundown: 1) Wood choice - I didn't have a lot of say here in the workshop as you might imagine. Some people were essentially building Pisgah "Rambler" model banjos, which have 3 piece necks and spun over rims. Those of us building wood rim banjos were putting these necks on Pisgah "Woodchuck" model pots ("Woodchucks" normally have a 1 piece neck). The neck woods were mostly mahogany with a strip of (what I think is...) maple (??) running down the center. El Hefe's pot is black ash, which is kind of a surprising choice for a banjo rim; Pisgah prides themselves on using sustainable materials (persimmon, richlite, and now ash!) and we followed suit for our Pisgah-esque creations. 2) Pot diameter - Lately I've been enjoying 12" banjos and I asked Patrick if I could build one in the workshop - once again, I didn't realize that this would determine the type of banjo everyone built : ) These banjos have a bit more bass though this sometimes comes at the expense of cut...(but my tone ring choice below certainly compensated in the "cut" department....) 3) Scale length - Due to my reliance on left-hand positions in my playing (see here), I prefer the slightly shorter scale lengths (25-25.5") used by many old time banjo makers today. Pisgah typically uses the more-common 26 & 3/16" scale length, though they have shorter scale (25.25") banjos available as well. I urged Patrick to let me build a short scale...once again, everyone else had to go down this road as well : ) 4) Truss rod - Patrick uses a truss rod of his own design and installing it was just about the first thing we did to the banjo neck (see first pic above). Interestingly, the truss rods we used were reverse-threaded so that you turn them clockwise to loosen them and counterclockwise to tighten them. I'm usually glad to have a truss rod in my banjos from a comfort standpoint : ) 5) Fret size - El Hefe ended up with large frets (which I prefer for my playing, though this is a matter of personal preference) - according to Patrick the smaller fretwire is actually easier to work with, but he prefers large frets as well so I lucked out here. 6) Rim depth - Once again, I ended up with a 3.5" deep pot to match my Buckeye! I was thrilled about this but it was actually a last-minute realization that made it work out this way (more in the tone ring section below). I had to drill the shoe-mounting holes higher up on the pot to accommodate the deep rim with shorter hooks (Greg actually used special long hooks on the Buckeye). 7) Rim thickness - Patrick prefers rims that are ~9/16" thick for a couple of reasons: they are thick enough to resist warping; they fit the shoes built by Pisgah's sister hardware company Balsam banjo works. He pre-glued El Hefe's Ash rim in Pisgah's amazing rim press, but I turned it down to size on the lathe, which was pretty nifty. 8) Number of hooks - El Hefe ended up with 18 hooks, much fewer than the 26 on the buckeye; this has yet to be an issue. We really could have used any number of hooks we wanted since we used a grooved, rather than notched, tension hoop. However, Patrick had a template made up for 18 hooks and had only brought enough for each person to max out at 18...so I followed his lead here : ) 9) Head type - As usual, I went for a Renaissance head (though obviously this is easy to change in the future) - I just like how much bass you can get with this type of head. Funny story about this - despite Patrick's insistence that we don't market our banjos as "Pisgah" banjos, he provided us with Renaissance heads with the "Pisgah seal" stamped on them. Apparently he can actually get these cheaper from the manufacturer than non-stamped heads; supposedly they structure the pricing this way so that a builder doesn't buy a bunch of plain heads and flip them for resale. 10) Tone ring - If you've got an eye for tone rings, you've noticed that El Hefe actually has a White Laydie tone ring! Not sure that too many 12" diameter, 3.5" deep white laydie banjos exist in the world, but someone should make this a standard model! The sound is fascinating - its not overly brash right next to it (though its hard to call it a quiet banjo) but it travels for miles! People have told me they can hear my banjo across a parking lot...which I kinda love! I ordered the tone ring from Rickard and it made a last-minute arrival to the folk school (relayed by my loving wife) just in time to get it on the banjo. Patrick's pots are ~2 3/4" deep uncut and we stacked the 3/4" tone ring right on top to make a 3.5" deep pot. His natural inclination would have been to cut this down to size but I protested...I absolutely love the way it came out! One nifty thing about Rickard's tone rings - the "scalloped band" from the white laydie and the "curved tube with holes in it" from the tub-a-phone are actually interchangeable; if I ever wanted I could buy the tub-a-phone piece and change it out for fun. El Hefe! Here's a pic of the final product, complete with my buddy Lindsey (fiddler, banjo player, woodworker extraordinaire!) in the background. 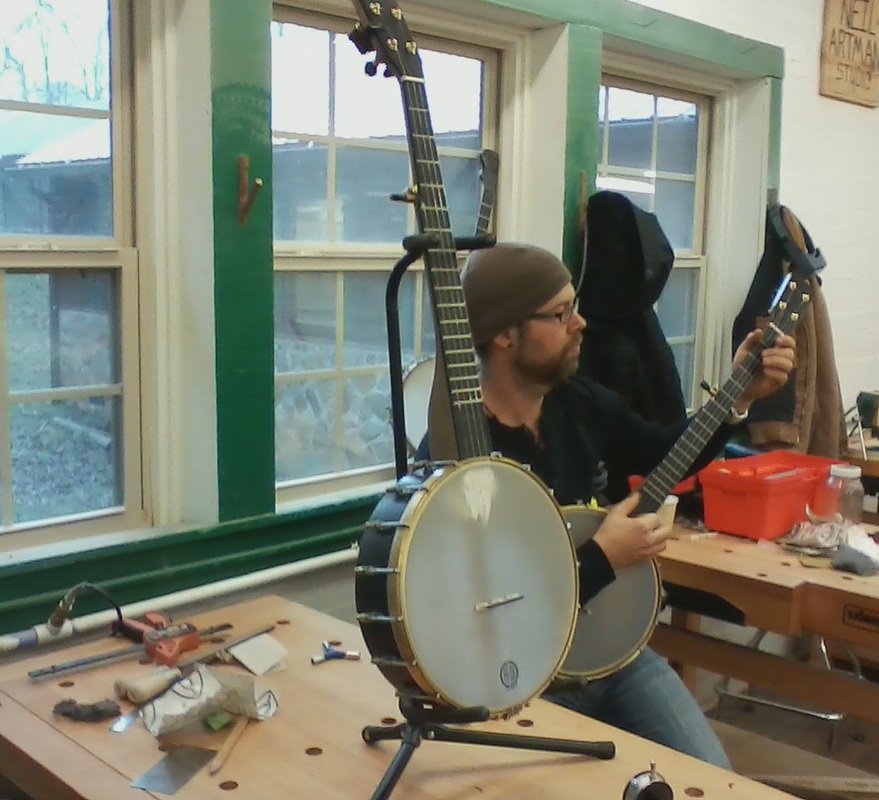 El Hefe in all his glory...and Lindsey with his new creation as well : ) I saw Lindsey's banjo at Clifftop and he's done some work since this picture: he used some paint effects to "age" the pot and added a skin head. Lindsey has gone on to make a second banjo (and maybe even more by now!) - he's a really talented woodworker and has decided to add banjos to his commercial woodworking repertoire.
To finish out, just a bit about the name: Lindsey actually came up with it as a play on the name "Jeff." Given the gravitas of this banjo, El Jefe (which means "the boss" in Spainish) is certainly fitting! As a guy who spent many hours listening to NOFX in his teens, I decided to go with the anglicized "H" version of the spelling after their guitarist - El Hefe certainly has more of a punk rock vibe than any of my other instruments : ) Thanks to Jeff Johnston for the building pics!
This past Monday, I played a square dance with the recently-formed "Sigogglin' Stringband" and I thought I'd take this opportunity to give a bit of an overview of that experience with the hopes that it may be useful for those who have not played one before. Rather than stringing together random musings from the experience, I got a bit of inspiration from my day job as a scientist: I actually gathered data and even did a few summary stats to add to the story.
I'll say right here that I thought about going full on nerd with these data (graphs, statistical tests, transformations if necessary) and even considered writing this post in scientific paper format.....but though it would be fun for me to write a methods section about playing a gig (in passive voice no less: Banjos were tuned as follows....), it also sounded like a lot of work and probably wouldn't be a ton of fun for most people to read. Now that you know what you've avoided, lets get started : ) The Band For those not up on their obscure Appalachian slang, "sigogglin'" means "crooked," so we were essentially billed as "the Crooked Stringband." I'll admit this is a bit of a funny name for a square dance band since actual "sigogglin" tunes would presumably be discouraged at such an event, but I love the name nonetheless. Also, about half the promotional info for the event listed us as the "Sigooglin Stringband" potentially due to some michevious auto-correcting when our name was being relayed to the organizers via text message....hilarious! The band was a quartet: 2 fiddles, one guitar, and myself on banjo; one fiddler played harmonica (really, I should say he "absolutely shredded on harmonica") on a few tunes for variety. This seems like a reasonable lineup for a square dance band, though many bands may come with a bass to drive the beat home as well. I actually kinda liked that we didn't have a bass because it put a little more pressure on the rest of us to play solid rhythm and I got to share the bass zone with the guitarist. Last time I played a square dance, I believe we had 7 people onstage (1 fiddle, 2 guitars, 2 banjos, 1 washboard, 1 bass); this sounds excessive but it sure was a lot of fun : ) I guess the point here is that there are a variety of lineup choices out there - as long as you can play fiddle tunes at a steady pace for long periods of time, any combination of instruments could play a dance. I've heard of dance bands that include drummers, brass instruments, tin whistles, ukuleles, pianos...the list goes on! The tunes It turns out we needed 10 breakdowns and 3 waltzes (Table 1). Some of our band members have played a lot of Contra dances as well where medleys (often with tunes of varying keys) are more the norm; these would work for square dances too but we ended up not playing any. Due to my reliance on open tunings, the key-switching part of this would be difficult from my standpoint. I could have re-learned a couple simple tunes in the "wrong" tuning to make this work, or we could have strung together medleys of tunes in the same key, but in the end we just picked 13 great tunes and knocked them out of the park....or at least thats what I hope it sounded like : )
Table 1: General overview of the Kalamazoo square dance played by the Sigogglin Stringband in October 2016.
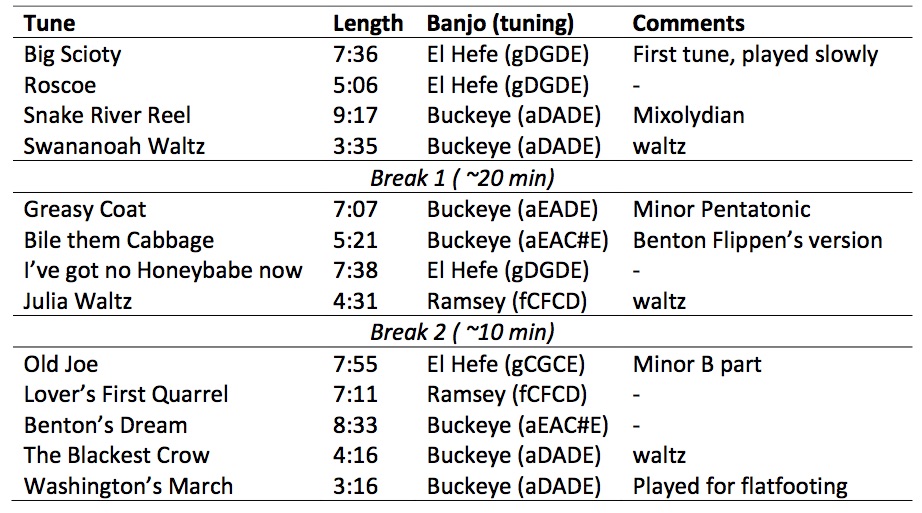
When choosing tunes, its nice to have some variety in sound. While the common joke is that "all fiddle tunes sound the same" there is obviously plenty of variation to choose from in reality. However you are limited to choosing non-crooked breakdowns that sound good fast and waltzes as necessary. As an aside: I'm using a pretty loose definition of "breakdown" to mean any danceable tune in 4/4, and a definition of "waltz" that simply means any tune in 3/4. To get max variation in tunes you can vary keys/modes (make sure to throw some mixolydian and/or minor pentatonic tunes in there), notey-ness ("Red Haired Boy" is really notey, whereas "Angeline the Baker" is less-so), and tune length ("Cripple Creek" is half as long as "Soldier's Joy").
We certainly varied by key/mode a great deal: we had Mixolydian and minor pentatonic tunes....and "Benton's Dream," which we'll just call "bluesy" b/c its mostly Mixolydian, but hits both C natural and C# in the A part in quick succession (...at least the way I play it...). Also, we veered from the commonly used tonal centers of G,C,D, and A by adding F major tunes, for which I had to use what I'll call "Old F" tuning (a full step down from "Old G") as indicated above. The Banjos As you can see in table 1, I was playing in 6 different tunings: aEAC#E, aEADE, aDADE, gDGDE, gCGCE, and (gasp!) fCFCD. Rather than trying to constantly retune, or make the band group tunes by tuning for my benefit, I just brought 3 banjos: my Buckeye (post on that here), the "Pisgah-esque" banjo nick-named "El Hefe" I built in a workshop in January (post on El Hefe coming soon...), and a 12" Ramsey Student that I borrowed from one of the fiddlers. The Buckeye handled open A, A modal, and double D; El Hefe handled Old G and open C; the Ramsey stayed in F. If you look at Table 1 closely, you can see the advantages of bringing 3 banjos: though I had to switch banjos (i.e. pick a new one off the stand next to me) fairly often, I only had to actually retune a banjo 4 times during the set. Furthermore, the tuning variations used on a single banjo weren't all that rough from a "tuning stability" standpoint: Re-tuned the Buckeye between the following tunes: "Swannanoah Waltz" (aDADE) and "Greasy Coat" (aEADE) "Greasy Coat" (aEADE) and "Bile them Cabbage" (aEAC#E) "Bentons Dream" (aEAC#E)and "Blackest Crow" (aDADE) Re-tuned El Hefe between the following tunes: "I've Got No Honeybabe now" (gDGDE) and "Old Joe" (gCGCE) Had I brought only 1 banjo, I would have had to retune nine times, and many of the jumps indicated above - for example, the jump between "Lovers first quarrel" (fCFCD) and "Benton's Dream" (aEAC#E) - would have been pretty rough on the neck (meaning that the banjo would take a while to hold tuning). Those that use Capos, play in more standard tunings (e.g. open G and double C rather than Old G and Open C), and avoid the key of F (!), may have had an easier time with one banjo. However, I should point out that people are quite impressed when you roll 3 banjos deep : ) The Caller If you find yourself playing a dance in the future, keep in mind that the dance caller is in charge: don't be afraid to ask them their opinions about how you should play, particularly when it comes to tune speed; we went so far as to ask our caller to tap their foot to set a suggested speed a couple of times. Also, many callers have opinions about tune choice that are helpful to know beforehand. For instance, many callers don't like modal tunes (not sure why...) and they may not want tunes with odd numbers of parts even if they're technically "square" overall. (a little elaboration on this last point): The version of "The Boatman" that most people play is a 3 part tune: the first 2 parts are short (like "Cripple Creek") and the last part is long (like "Soldier's Joy"). At a given speed it takes exactly as long to play through one round of "The Boatman" (AABBCC structure) as it does "Soldier's Joy" (AABB structure), which is unarguably a dance-acceptable tune. However, I've heard that some callers wouldn't want you to play an oddly-structured tune like "The Boatman" anyways - you may want to check if tunes like this are okay to play before practicing them in preparation for the dance. Our caller was super laid back about tune choice and was just fantastic all around in my opinion : ) Square Dance Stats Looking at Table 1, you can seen the general structure of the dance: it was divided into 3 sets, with 3 called tunes in each set, followed by a waltz. We ended the night on a breakdown, during which no dance was called (we got some flat-footers on the floor). The square dance tunes are summarized in Table 2.
Table 2. Square dance tunes (those during which a dance was called) and associated stats.
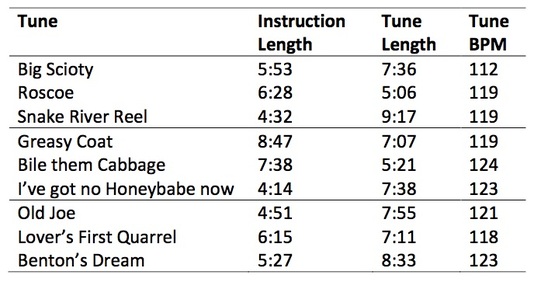
As is typical of square dances, a dance is taught by the caller before each tune is played - the amount of time taken on dance instructions prior to each tune is listed above. Interestingly, dancers spend almost as much time learning dances (54 min 5 sec) as dancing them (1 hr 5 min 43 sec). However, this doesn't include dancing during waltzes and flatfooting during the final breakdown number, which brings the total "dancing time" up to 1 hr 21 min 21 sec - quite a workout for the dancers in a ~3 hr period. Since we're playing this whole time, the musicians get quite a workout too: I was exhausted by the end of the night - I can't imagine moving a fiddle bow for that long!
Average tune length for the square dance tunes was 7 min 18 sec with a standard deviation of + 1 min 22 sec, indicating a decent amount of variance: indeed, the longest tune ("Snake River Reel") was a full 4 min 11 sec longer than the shortest tune ("Roscoe). In terms of speed, we averaged right around 120 bpm with a standard deviation of ~3.6 BPM. Most of this variance was likely due to the slow speed of "Big Scioty." The caller actually tapped out the speed of this tune and we followed his lead (I guess he wanted to "ease into the night" with a slower tune). Our fastest tune only clocked in at 124 BPM and I never really felt like we were lagging too much (nor did the dancers look too bored...); sometimes people forget that Old time music doesn't have to be crazy fast to be danceable : ) Though the recordings didn't come out too stellar quality-wise, I figured I should include at least one example file and I chose "Lover's First Quarrel" (below).
"Lover's First Quarrel" as played by the Sigogglin Stringband at a square dance in Kalamazoo Michigan in October 2016.
"Lover's First Quarrel" is a pretty nifty tune in F that I had to learn just for this dance; the band declared this their favorite tune of the night on the ride home. I chose to use "Old F" tuning (i.e. old G down a whole step) to play this tune along with "Julia Waltz." Both tunes are pretty great and I guess I should learn a few more F tunes to make this tuning worthwhile; our fiddler is a huge fan of "Acorn Stomp" so that may be next on my F list.
As I mentioned, I played a Ramsey student banjo for this recording, which pumped out a ton of bass possibly due to the fiberskyn head. This actually inspired me to try one on my Buckeye this week....but so far I'm leaning towards going back to the Renaissance (not every head works well on every banjo). The sound guy had my volume dialed waaaay up on this tune so there should be no prob picking the banjo out on the recording! This volume boost happened before the 3rd set and lasted until the end of the night (at which point I realized that I wished I knew "Washington's March," our big ender, a little better....). Final thoughts on Waltzes Many other square dances require far fewer waltzes that this one did - in VA the guideline was a single waltz to end the night. I've been picking up more waltzes in recent years and though I initially found clawhammer in 6/8 to be a little clunky, I've definitely come around to it and really enjoy playing them now! Some people revert to 2-finger or 3-finger for waltzes, generally picking out roll patterns from the chords rather than trying to find the melody. This sounds fine as well but I'd encourage everyone to try playing waltz melodies clawhammer style (hint, you can find some great clawhammer waltz examples in Mike Iverson's playing). Perhaps I'll do a future blogpost on waltzes as well : )
I'm not embarrassed to say that no how many cool new crooked and/or modal tunes I learn, "Spotted Pony," for all its squared-off Ionian simplicity, will always be one of my favorites. Years after learning it, I spend a good 20% of my day whistling this tune without noticing I'm doing it; some classics get that way for a reason : )
However, people's opinions on simple tunes vary: I've seen plenty of eyes roll when I call this one at a jam. The consensus seems to be that the first 4 notes of the tune (D, E, F#, G, - also the first 4 notes of a major scale) strike many as cheesy/simplistic/heavy handed. If you share this opinion, fear not; I have 27 remedies (actually, many more...) to this problem! Before we go much further, lets make sure we're on the same page - below you'll find a simple "Spotted Pony" tab (I often use this drop-thumb-free version as a first tab for banjo students) and a video of me playing the tune (for Elderly) on a 12" Pisgah Possum: ---------------------------------------------Click Here for a Tab of "Spotted Pony"-----------------------------------------
Me playing "Spotted Pony" on a 12" Pisgah Possum for Elderly Instruments
For full video, click here: www.youtube.com/watch?v=ovjxcOZZFb4
The offending "A part walk-up" actually occurs twice per A part (measures 1-2 and measures 5-6 of the above tab); if you watch the video closely, you'll notice that I actually have several variations on what I play during each "A part walk-up"....and I was kind of holding back a bit in this video, likely because it was the first one I ever did : ) Since the A part is played twice, you actually have 4 chances to alter this phrase every time you play the tune through; this is a super easy way to add some pizazz to what some see as an otherwise-mundane tune. Today I thought I'd share some of these tricks so that you can employ them to fend away the boredom next time you face this tune in a jam!
Examples 1-12, the "standard" walkup and several close variations: Figure 1 is the standard "bum ditty" version of the A part walk-up to "Spotted Pony" (identical to how its played in the tab above). 
Figure 1 - my standard bum-ditty-style A part walk-up in "Spotted Pony"
The normal chords that accompany the A part walk-up are as follows: D maj, A maj, D maj, G maj (one boom-chick each so 2 chords per measure). Notice that I don't quite hold down the right chords in my version: I should hold down the 2nd fret of the 2nd string during the strum on the 4th beat of the 1st measure to properly suggest the A major chord; this is lazy banjo, but it sounds fine and I'm pretty sure most other people play it this way as well : ) I do make the effort to hold down the 2nd fret on the 3rd string to suggest the G major chord during the strum on the 4th beat of the 2nd measure; this is mostly because I do notice when people don't do this, and its also quite easy to do while maintaining the left hand position indicated in the tab.
Variations 2-5 also follow the standard bum ditty pattern shown in Figure 1, but eschew brushes for single notes: 
Figure 2 - A part walk-up to "Spotted Pony" with brushes replaced by single notes on the 3rd string; notice that I still hold down the 2nd fret on the 4th beat of the 2nd measure to suggest the G major.

Figure 3 - A part walk-up to "Spotted Pony" with brushes replaced by single notes on the 2nd string.

Figure 4 - A part walk-up to "Spotted Pony" with brushes replaced by single notes on the 2nd string and 5th string pulls replaced by drop thumbs on the 3rd string (once again, check out the 2nd fret at the end of the 2nd measure - I find it easiest to start holding down the chord I use in figure 1 on the 3rd beat of the 2nd measure).

Figure 5 - A part walk-up to "Spotted Pony" with brushes replaced by single string notes on the 4th string (I put this one last because I'll elaborate on this idea a bit below...)
If you look at figure 5, you'd notice that we're essentially playing the walk-up notes twice in a row. We can expand on this idea and simply change where we put 5th string pulls for a few more variations (see figures 6-8).

Figure 6 - A part walk-up to "Spotted Pony" playing each note twice with constant double-thumbing (aka "bump-a-ditty" rhythm)

Figure 7 - A part walk-up to "Spotted Pony" playing each note twice with 5th string pulls in slightly odd places ("bump-a-dit__" rhythm?)

Figure 8 - A part walk-up to "Spotted Pony" playing each note twice with *Gasp* no 5th string pulls!
Though 5th string pulls are a hallmark of clawhammer playing, I actually find myself playing "Figure 8" fairly often in this tune - just kind of smoothes out the walk-up. Notice that you could insert some of the above 5th string pull variation from figures 5-8 into examples 1-4 thereby creating new possibilities!
Figures 9 and 10 rely on "ghost notes" (which I've talked about in a few previous posts like this one). These are a great way to "de-clutter" your playing while keeping the "bum-ditty" motion going. 
Figure 9 - A part walk-up to "Spotted Pony" using standard bum-ditty rhythm with strums replaced with "ghost notes."

Figure 10 - A part walk-up to "Spotted Pony" with constant double thumbing and "ghost notes."
Figure 10 is an approach that I don't hear too much (Mark Johnson of "clawgrass" fame does some of this) but I've starting bringing into my own playing recently. The two uninterrupted "upbeat" 5th string pulls in a row work as an interesting, and kinda funky, way to fill space in a tune - I've actually put together a version of "Yew Piney Mountain" that takes this idea even further....I think this will be the subject of a future blog post so I'll leave it there for now : )
Figures 11 and 12 are based around a "Galax" lick, which is basically a slow brush that ends on a 5th string pull on a down beat. Its easiest to play these by holding down the "chord shapes" used in figure 1 with your left hand. 
Figure 11 - A part walkup to "Spotted Pony" with a 2-string galax lick. The 4th and 3rd string notes are played as eighth notes on the on-beat and the up-beat.

Figure 12 - A part walkup to "Spotted Pony" with a 3-string galax lick. The 4th, 3rd, and 2nd string notes should be phrased as a triplet.
Galax licks are nifty.
Examples 13-14; playing the walk-up in higher octaves The walkup lick can also be played in higher octaves. I've written these out using the "ghost note" approach similar to what is shown in Figure 9. However, you can combine these "high octave approaches" with brushes and/or thumb pull variations shown in Figures 1-10 to make a whole mess of variations on these ideas as well : ) 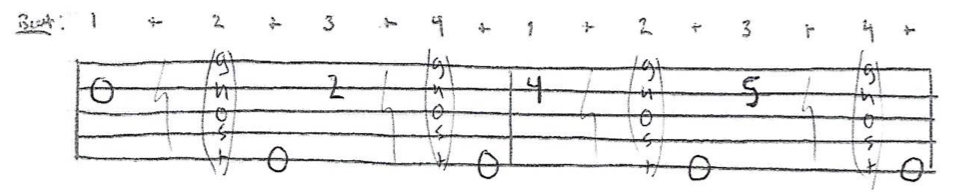
Figure 13 - High octave A part walkup for "Spotted Pony" with "ghost notes." This will actually put you in the same octave as the standard fiddle part.
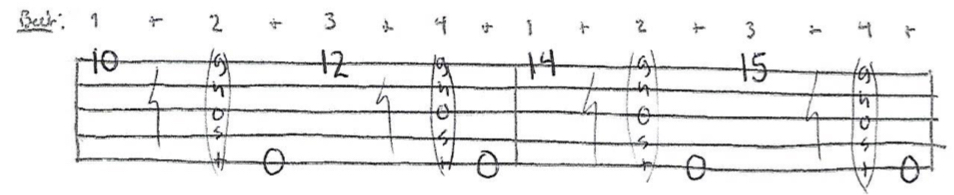
Figure 14 - Even higher octave A part walk-up for "Spotted Pony" with "ghost notes." This is a bit of a goofy move that I only throw in once in a blue moon to make other players in a jam giggle : ) My Buckeye is actually scooped after fret 15 so this high G is actually the highest note on my banjo.
Examples 15-18; harmonizing the walkup
These variations employ 3rds (2 notes up the scale above the melody) and 6ths (5 notes up the scale above the melody) harmonies for the A part walkup to "Spotted Pony." Once again, I used the "bum-ditty ghost note" versions similar to what is shown in Figure 9, but you can take some inspiration from Figures 1-10 for variations on this theme. As harmonies, these work best when played alongside at least one other instrument thats holding down the melody (they also turn heads in a jam : ). 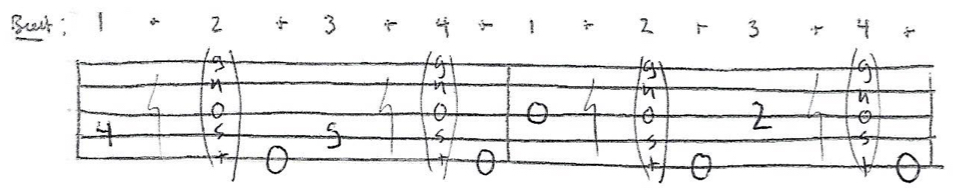
Figure 15 - 3rds harmony for the A part walkup of "Spotted Pony."
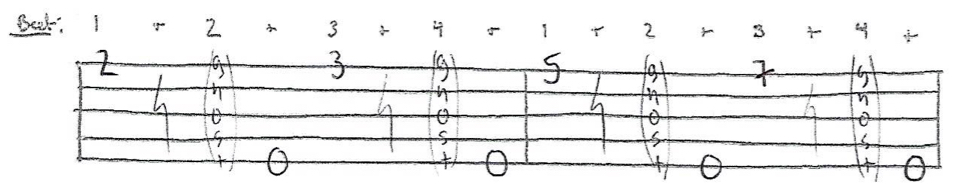
Figure 16 - High octave 3rds harmony for the A part walkup of "Spotted Pony" (just an octave up from what we played in figure 15)
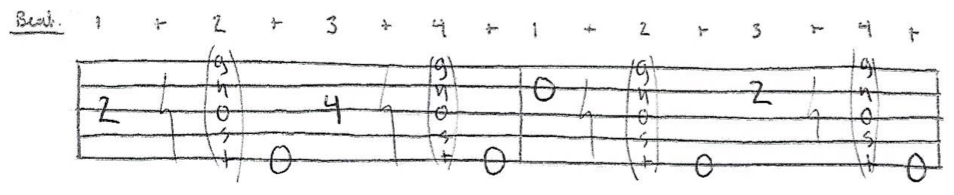
Figure 17 - 6ths harmony for the A part walkup of "Spotted Pony."
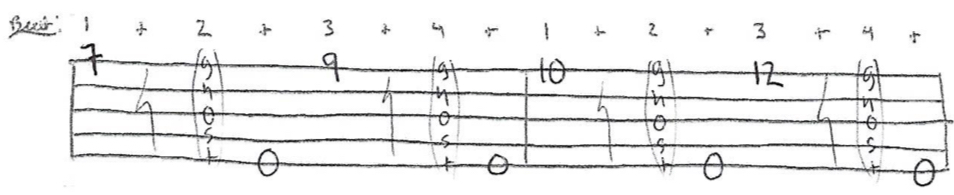
Figure 18 - High octave 6ths harmony for the A part walkup of "Spotted Pony" (just an octave up from what we played in figure 17)
Before moving on, its kinda neat to think about how these harmony notes augment the chords accompanying them:
The 3rds walkup uses the following notes: F#, G, A, B. All of these notes are part of the simple triad chords that back them except for the G, which is actually adds a flattened 7th to the A major triad that co-occurs in the harmony; while the goal of playing these notes was initially just to harmonize the walkup, I ended up adding some inadvertent flavor to the backing chords. The 6ths walkup gets even a bit more crazy; the notes are as follows: B, C#, D, E. While the C# and D both occur in the A major and D major chords that back these notes, the B and E both provide a jazzy sounding 6th harmony to the G major and D major chords that back these notes. I tried this harmony out while playing with a friend this morning - I like it but I could see it being a little "far out" for the traditionalists : ) Examples 19-20; the chromatic walk-down I'll say this first: I definitely lifted this trick from one of Donald Zepp's youtube videos (I think he was playing a 13" Romero). The second I heard it, I just had to figure it out for myself! Since then I've been peppering it in at jams and I almost always get asked about it afterwards. The chromatic walk down is pretty simple - simply start at D and, as the name implies, go down by 1/2 steps from there. The notes are therefore: D, C#, C, B. I've got the low octave (Figure 19) and high octave (Figure 20) versions of the chromatic walk-down tabbed out below. As with examples 11-18, I just put in the "bum-ditty with ghost notes" variation of the chromatic walk-down examples and you can add in strums, drop thumbs, 5th string pulls etc in line with examples 1-10 for a lot more variation! Once again, these probably sound best alongside another instrument carrying the melody. 
Figure 19 - the chromatic walk-down for the A part of "Spotted Pony."

Figure 20 - the high octave chromatic walk-down for the A part of "Spotted Pony."
As with the 3rds and 6ths harmonies above, its fun to think about how the notes we're playing here augment the chords, with the added dimension that one note of the walk-down (the C natural) is actually not in the key of the tune (D major). In fact, the other notes in the walk-down work quite well: the D, C#, and B notes from the chromatic walk-down are all actually notes from the D major, A major, and G major triads that back these notes while they are being played; the C natural adds a flattened 7th to the D major chord that backs it, turning it into a dominant 7th chord. The C natural gives a bit of a "ragtime sound" to the tune and its definitely the note that sticks out in the chromatic walk-down. The fact that the C natural is not consistent with the key of the tune is irrelevant; as I discussed in my post on harmonizing cluck old hen (here), if a harmony sounds good, it is good!
Examples 21-24; Harmonizing yourself in the walk-up As I mentioned in examples 15-20, there are some great ways to harmonize the A part walk-up to "Spotted Pony," but they sound best when played alongside the main walk-up melody. However, with some creativity, you can actually harmonize yourself in a couple of different ways. Once again, these are "bum-ditty, ghost note" figures to show you which notes to pick but you can alter them by varying 5th string pulls etc. 
Figure 21 - The A part walk-up and the chromatic walk-down played at the same time! Think of this as a combination of Figure 9 and Figure 19.
Figure 21 sounds super fancy but its actually pretty easy if you stick to a single left hand position (post on left hand positions available here):
Index finger - 2nd Fret Middle finger - 3rd fret Ring finger - 4th fret Pinky finger - 5th fret 
Figure 22 - the A part walk-up and 6ths harmony played at the same time. Think of this as Figure 9 plus Figure 17 (though I've had to move some notes from the 2nd string to the 3rd string).

Figure 23 - The high octave A part walk-up and high octave 3rds played at the same time. Think of this as Figure 13 combined with Figure 16.
Figures 22 and 23 require left hand position shifts. I find it easiest to start in the position I suggested for Figure 21 above, then shift to the following hand position at the beginning of the 2nd measure:
Index finger - 4nd Fret Middle finger - 5rd fret Ring finger - 6th fret Pinky finger - 7th fret One more thing to note with figures 21-23: since you've got notes on 2 adjacent strings, all of these "harmonize yourself" phrases could easily be done using the 2-note "Galax-lick" approach shown in Figure 11... Examples 24-27; grab bag of other random walk-ups I like No real organizing principle here - here are just a few other random things I like to do with this walk-up : ) Enjoy! 
Figure 24 - high and low octave walk-up double thumbing. The notes are the 4th string are meant to be played as drop-thumbs; usually I indicate this by writing brackets around these notes on my tabs but I forgot...and really don't want to go back to the scanner : )
Left hand position tip for figure 24: you could use the hand position I outlined for Figure 21 and bar across all the strings but this is a little bit hard on the fingers. I often play this using my index finger on the 4th string and my middle finger on the 2nd string - I just slide up for each fret I need to hit.

Figure 25 - High octave walk-up with a drop-thumb-infused roll pattern - notice that I hold down the 2nd fret of the 3rd string to suggest the G major chord (similar to what I do in Figure 1).

Figure 26 - the "Drop-thum slap" walk-up.
Figure 26 is also a head turner at a jam (though I'd advise using it sparingly out of tastefulness)! I basically play the first 2 notes of Figure 24, but really dig my thumb under the 4th string, pull it away from the fretboard, and let it slap back down hard. Kathy Fink does a lot of this in her playing and I just love it! Here I let the note ring out by not playing anything on the following on- or up-beats; I then take a short break from bum-ditty for these beats and use the time to get my hand back to the strings for the 3rd beat of the first measure!

Figure 27 - The "fret the 5th string" walk-up
Figure 27 looks a lot like Figure 6, except for the last 3 notes, which involve fretting the 5th string! This is a bit of a controversial move for some and one that I don't really do often but I thought I'd throw it in to point out the following: while we assume that the 5th string is always a welcome note in our playing, it actually clashes a bit with the G major triad (making a "2nd" interval) that is played for the second half of the 2nd measure. As banjo players, we don't actually have to stand for this! We can (and many, such as Ken Perlman often do) fret the 5th string to address this issue. Fretting the 5th string at the 7th fret (kind of like it's 2nd fret...) actually changes this note to a B, the major 3rd of a G major triad - problem (if you saw it as one...) solved! I find that the same left hand positions I suggested for Figures 22 and 23 work well for this phrase too.
------------------------------------------ Well, this turned to a bit of an epic blogpost so I'll sign off for now. Before I go I'll just point out one more time that you can combine a lot of these ideas together and easily come up with nearly 100 different ways to play the A part walk-up to "Spotted Pony" - see if you can avoid repeating a walk-up phrase next time this comes up in a jam! Tomorrow night, I play my first Michigan square-dance (I've played few in VA, but never in America's high five!). Looking forward to giving a summary of the gig next week! |
-----
|
 RSS Feed