|
It's done: I've added a 6th (extra bass) string to my Pisgah-esque banjo build "El Hefe" (more on El Hefe here)....and its amazing! I'm still in the "experimentation" phase of learning how to play the thing - for this week, I'll share some pics of the process and throw a "teaser" sound file in at the bottom of the Post. I'll likely do a more in-depth post on the various uses of a 6 string banjo in the future.
Adding the extra tuner: In the past two posts on this topic, I sketched out my plans for adding an extra bass string to El Hefe (here), then described adding extra slots to the nut (here); the only thing remaining from a hardware point of view was to add the extra tuner, for which I enlisted the help of a friend who's garage is slowly being converted to a fully-equipped woodshop (f.y.i., he and I have plans to do a bit more banjo building in the near future...I'll definitely be devoting future posts to some of those adventures come to fruition). The tuner I was adding was a brass tuner I purchased from Balsam Banjo Works (pictured below), which matched the other 4 on "El Hefe." 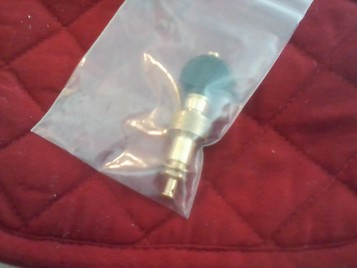
The brass tuner I got in the mail from Balsam Banjoworks.
As I mentioned in previous posts, I had planned on putting the additional tuner right in the middle of the headstock (not really sure where else to put it on a paddle-head banjo). Patrick Heavner (owner of both Pisgah Banjos and Balsam Banjoworks) told me installation required drilling a 3/8" hole. Not having a drill-press at our disposal, my buddy and I had to come up with a plan for "straight as possible" drilling with a hand drill to get the new tuner installed. In comments to a previous post (here) my buddy Stew mentioned the existence of something called a "doweling jig" which clamps on to a piece of wood and guides your drill bit to make a perfectly straight hole. While I didn't end up a doweling jig, my buddy and I basically made a low-tech alternative using scrap wood. The process went as follows: First we tried to drill a really straight hole in scrap wood using the 3/8" bit we'd be using to install the tuner (this took a few tries); once we got something that appeared straight, we clamped it on to the headstock with the hole centered where the new tuner was going; finally we inserted the bit into the "scrap wood doweling jig" and used the previously-drilled hole to guide our bit straight through the headstock. Believe it or not this worked pretty flawlessly:
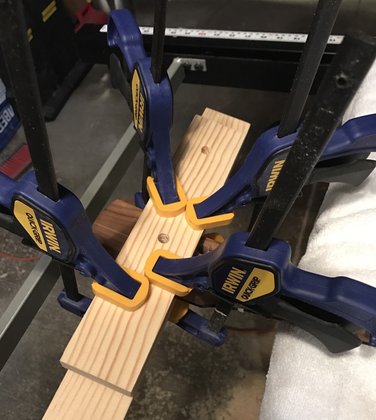
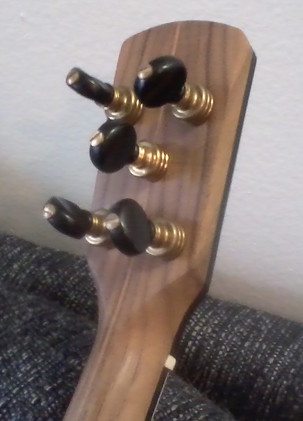
Drilling the hole for the new tuner. You can see my homemade "doweling jig" which was used to guide the drill. Note that I had to take all the other tuners off to do this.
Once the new hole was drilled, I installed the new tuner and strung up my "new" 6 string banjo:
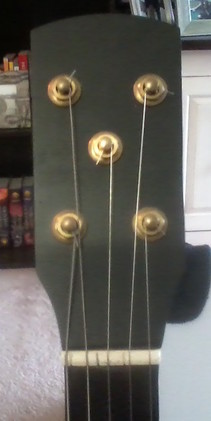
After tuner installation. The tuner ended up pretty close to center and works great! If you look closely, you'll notice the center tuner is quite noticeably more shiny then the other ones : )
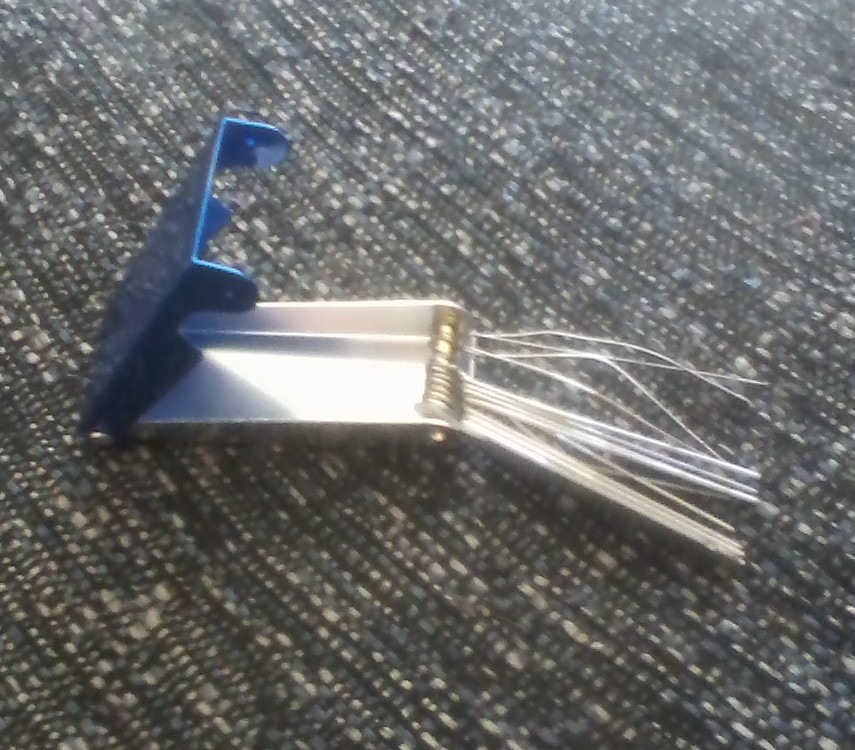
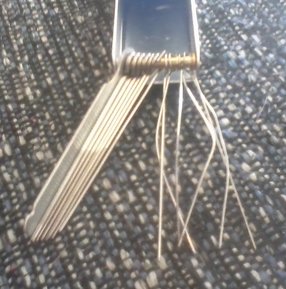
As I mentioned last week, I decided to just use my existing 5 string no-knot tailpiece and double-up strings on the middle "nub." 6 string tailpieces are available for fairly cheap but for the life of me I can't think of a super-compelling reason to buy one as what I've done seems to work just fine:
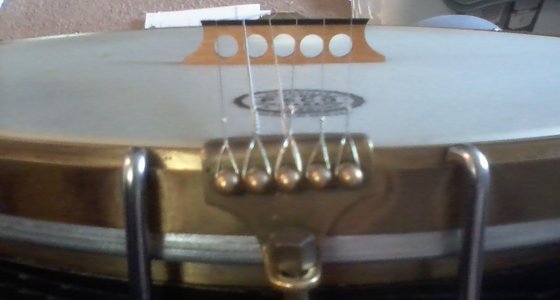
Closeup of the tailpiece with the 3rd and 4th strings doubled up on the same "nub."
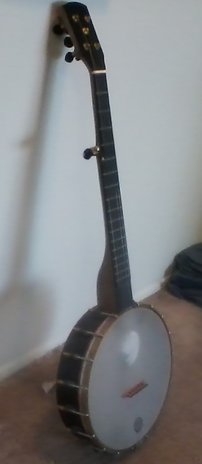
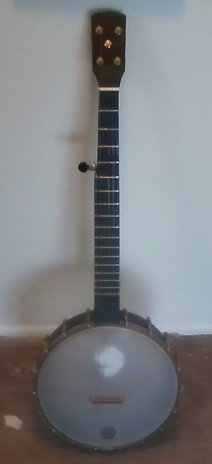
Once again, this came out like a dream! It's like the banjo was purpose built this way. Here's a couple of final product views for good measure:
The final product: El Hefe has a 6th string....and sounds pretty cool!
I ended up using a 32w 5th (bass) string that I stole from a pack of strings for Irish tenor banjo. I'll admit its a bit light - tuned up to A its tolerable if a bit anemic sound wise; tuned down to G its unacceptably "floppy" and can't even hold decent intonation up to the 4th fret as a result. I'll definitely have to go bigger on the 5th (bass) string quite soon. The guy from Banjohangout who gifted me the 6 string bridge recommends a 40w for the 5th (bass). For the sake of my fingernail, I'd like to end up a hair lighter than that if possible.
But how does it sound?? For today's test file, I decided to play Clyde Davenport's "5 miles from town." I did this because, while I love hearing this tune on fiddle, the banjo part I've had to settle into for it leaves something to be desired on a standard 5 string. Fiddlers play this D tune so that the A part is in the low octave for a fiddle in first position, while the B part is in the higher first position octave. If I want to stay below the 5th fret on a banjo (...which I typically do...) I only have enough notes to play both parts in the same octave on a 5 string banjo. The A and B parts of "5 miles from town" have some similarity, and the tune ends up sounding just a bit monotonous without the musical distance between octaves to further differentiate the parts. However the added bass string on El Hefe finally unlocks the low octave for the A part of this tune!! In fact the very first melody note in the sound file below is an open A (5th/bass) string:
"Five Miles from Town," a pretty nifty Clyde Davenport tune played on my Pisgah-esque banjo
"El Hefe," post the addition of an extra bass string!
Hope you enjoyed following along to this construction adventure! Once again, I'll definitely post some more sound files in the future. Finally - a big thanks once again to the kind 6-string enthusiast who sent me free bridges for this project, and a big thanks to my building-buddy for loaning me shop time and tools : ) As you may have noticed, I'm being a bit cagey with names because I haven't asked their permission to use them; however - due to the kindness of these two people, this whole project only cost me ~$35....way less than I would have paid for a purpose built 6 string.
9 Comments
Last week (here), I laid out my plans and reasoning for adding a 6th string to El Hefe, the "Pisgah-esque" banjo I built in a workshop last January (more on that here). This past week, I received the remaining necessary materials (i.e. a set of nut files and an extra tuner) in the mail, and today I got about halfway through the conversion process. Unfortunately, I was not able to finish converting El Hefe to a 6 string today, and I've got too much "real work" (...microbiology stuff...) to catch up on tomorrow to finish up this weekend. Therefore, I regret to inform any regular readers that this series of posts has turned into a 3-parter and, sadly, there will be no sound files further down the page for you to chew on : ( However, I did make progress and I'm pretty eager to share, so here we go: New plan for adding slots to the nut: If you read last week's post (again here) you'll remember that, rather than making a new nut for El Hefe's 6 string configuration, I decided to simply add extra slots to the existing nut and live with the resulting mess. My original plan was to use the existing 1st and 4th string slots for the new 1st and 5th (bass) strings and cut 3 additional equidistant slots between the two as follows: 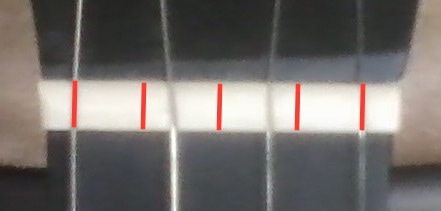 Figure 1 - My original plan for where to put the 5 long strings in the 6 string configuration of El Hefe (in red). Note that the "outer slots" would have been left where they were for this plan. ....however, after thinking about this a bit more I decided to alter this plan a bit. While I would still use the old 1st string slot in El Hefe's new 6 string configuration, I decided to cut a new 5th (bass) string slot a bit to the left of the old 4th string slot. Once this was done, I would cut 3 equidistant new slots between the (old) 1st and (new) 5th string slots for the remaining 2nd, 3rd, and 4th strings. I chose this path for 3 reasons: 1) I could make the string spacing at the nut just a hair wider. While the old spacing of 1 3/16" was probably going to be wide enough, I figured it couldn't hurt to go a little wider if possible; in the end I was able to add another 1/16" without the 5th (bass) string being in danger of flopping off the edge, so I went for it. 2) I could easily convert the banjo back to a 5 string if I didn't like the results of the 6th string addition. If I widened the existing 4th string slot too much to make room for a fatter 5th (bass) string, I might have problems putting a 21w (my preferred 4th string gauge) in there if I ever choose to shift El Hefe back to a 5 string. While I'm pretty stoked about having a 6 string currently, El Hefe is just a phenomenal 5 string banjo and I could see myself wanting to shift back in the future (though I'm not sure what I'd do with that pesky extra tuner I plan on adding : ) 3) Moving the 5th string over centers the string spacing. This one takes a bit of explaining for those who may not spend much time thinking about banjo construction. Though its to the left side of the nut, the 3rd string is actually the "center" of the banjo neck; see pic below: 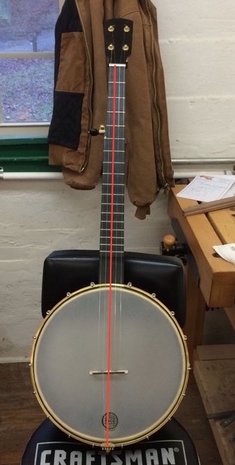 Figure 2 - "Brasstown Belle," Jeff Johnson's hand built "Pisgah-esque" banjo and a littermate of El Hefe (Pic courtesy of Jeff Johnson). I've marked the path of the 5th string in red; you can see that it goes over the center of the bridge and tail piece; it also marks the center of the neck where it meets the pot. As a result of the left side of the neck being "cut away" above the 5th string, the 3rd string sits towards the left site of the nut. However, the 3rd string is still correctly though of as the "center" of the banjo neck. Hopefully that picture helped illustrate what I was talking about above (there are likely much better explanations at www.banjohangout.org). The logic for my change in plans therefore goes like this: on a 5 string banjo, the 3rd string should be "centered" on the neck. On a 6 string banjo, the neck should similarly be "centered" halfway between the 3rd and 4th strings. However, if you look at my original plan (Figure 1) the original 3rd string slot is not centered halfway between the new 3rd and 4th string slots; rather, its skewed a bit left. By moving the new 5th (bass) string a bit left and leaving the 1st string where it was, I hoped to correct this error. Actually filing the new nut slots: To actually do all of this, I bought what can only be described as the cheapest set of nut files available from Amazon. To be clear, I mean "cheapest" in every sense of the word: The whole set, which includes 14 files of various sizes, only cost me ~$10, while individual files usually cost ~$20 each. So I saved some cash but the files were crazy dull, and it took me several hours to file 4 slots. Furthermore most of the files bent in the process. I only have the "after" pictures, below:
Figure 3 - "Mr Power Music Sander Files for guitar nut and bridge saddle" that I bought from Amazon. While the name is definitely amazing, and likely worth the price alone, nearly every file I used bent (see right image) and I'll likely never get another use out of these. I used my old strings slots as guides for how thick of a file to use and how far to file down into the nut. Despite the bent files, I'm actually pretty pleased with the results in the end. Below is a closeup pic of the nut with the new and old slots visible: 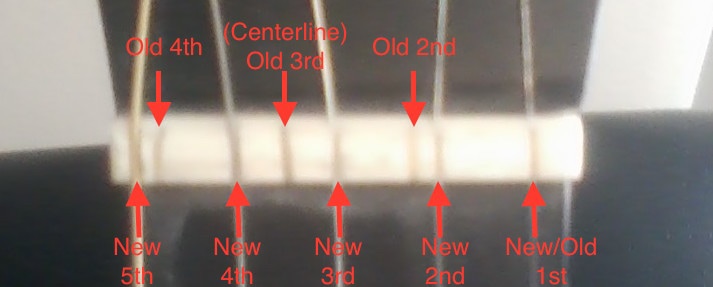 Figure 4 - The nut after my hours of labor with "Mr. Power Music Sander Files...." As you can see, the "Old" 3rd string falls halfway between the "new" 3rd and 4th strings; mission accomplished! After getting the nut slots cut, I put a 30w guitar string on the 5th (bass) string slot, tuned it up to pitch (low A), and plunked around a bit....sounded pretty cool!! Final thoughts for now: As I've said, I've yet to drill the hole for the new tuner but I plan on doing that at a friend's house this coming week. I couldn't resist seeing what the final product would look like with a string in every slot, so I doubled up on one of the tuners and one of the tailpiece knobs and took the following pics:
Figure 5 - Closeups of the head/bridge and fretboard/nut of El Hefe in its new 6 string configuration. Those aren't the best pictures, but I'll try and take some good ones once the new tuner is up and running; I just can't wait!! Also, I plan on ordering a couple of loop end options for the 6th string - the 30w string I tried seemed okay but its much lighter than what's been recommended (40w) so I'll try a few heavier options as well.
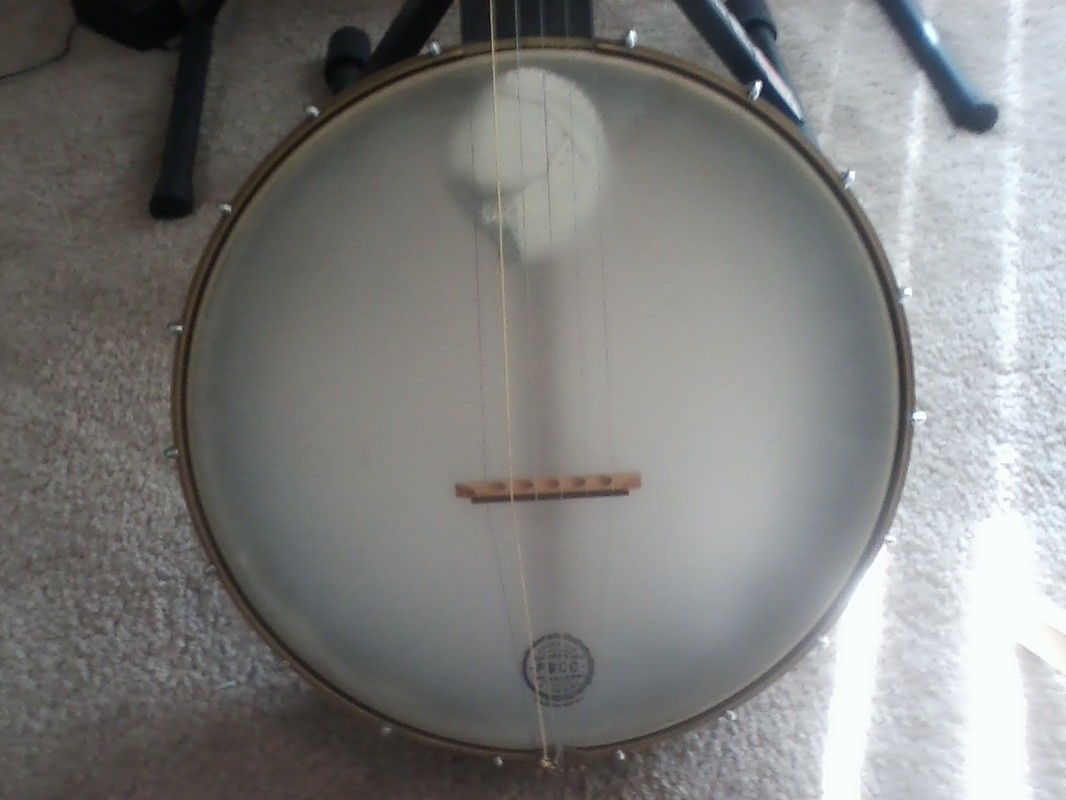
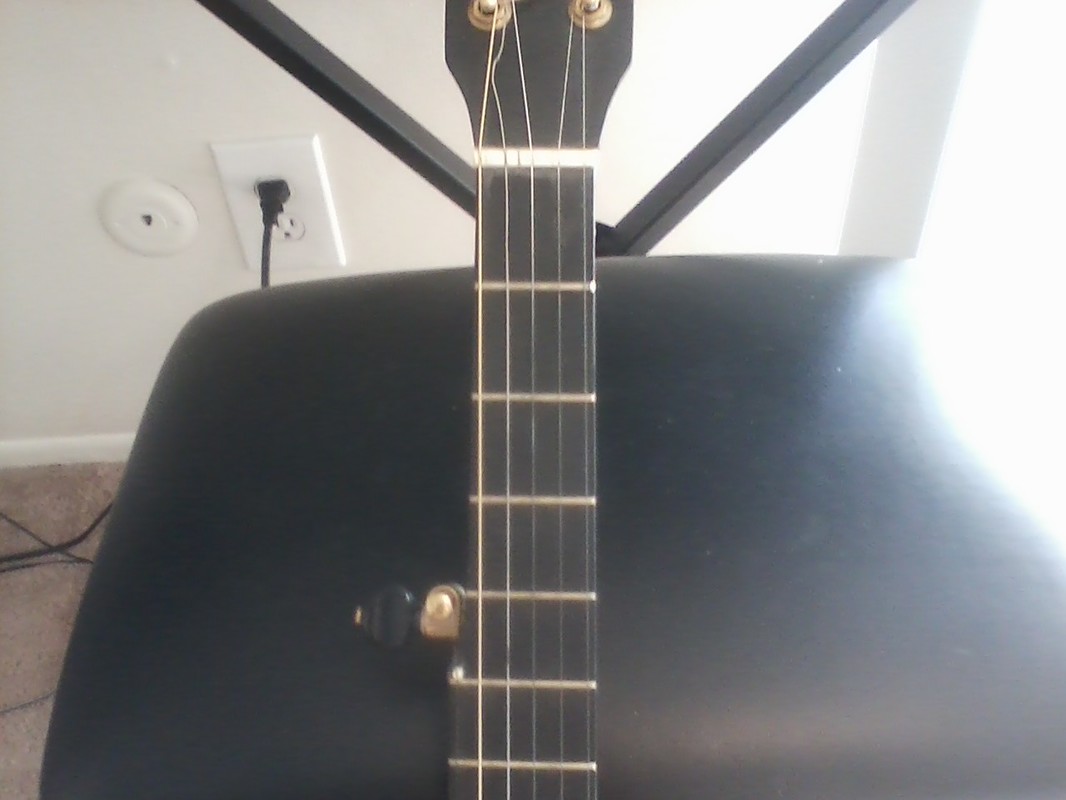
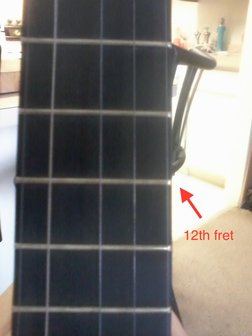
Thats all for now - stay tuned for sound files in the near future! Following up on last weeks post (here), in which I described the addition of a round brass tone ring to my Buckeye, I'm using this week's post to talk about my next bit of banjo tinkering: adding a 6th string to El Hefe, the "Pisgah-esque" banjo that I built in a workshop just over a year ago (post about that process here). This project is still in the planning stages, so today's post will part 1 of a two parter....however I've got the necessary equipment on order so I hope to bring you part 2 quite soon! Motivation: Why add another string to my banjo?...and where would it even go? A couple months back, I got my hands on a Gold Tone 6 string banjo owned by a local Old Time musician and took it through a couple D tunes alongside a fiddler. I'll clarify here that when I describe a 6 string banjo, I'm not talking about a banjo that is tuned like a guitar (commonly known as either a banjitar or guit-jo depending on who you talk with); rather, the instrument I am talking about is basically a 5 string banjo with an extra bass string added between the 4th string and the 5th/drone string (which I guess is best referred to as a 6th string in 6 string configuration). When tuned to the equivalent of double D (aDADE), the added bass string on a 6 string banjo is tuned an octave below the 3rd string (i.e. aADADE) giving the instrument extended range. For various reasons (outlined below), playing this banjo was an amazing experience! A couple week's back I wrote a pair of blog posts about playing in the low octave (here and here) with the second post focusing on techniques for filling space when you run out of range in the bass register; with a 6 string banjo, this particular annoyance happens less often : ) Playing the Gold Tone that night, I was instantly able to play the whole low octave B part of "Soldier's Joy" (which I focused on in the aforementioned low octave post, again here) along with low octave arrangements for several other tunes. On a related note, there are tunes for which the banjo lacks the range to even play the standard octave melody (i.e. an octave below the standard fiddle part) and the added bass string fixed this issue for a couple tunes as well. I'll avoid getting too "into the weeds" about this until I've got a 6 string in hand to give some audio files.... On top of how musically-useful the extra bass string on the 6 string was, I was also amazed at how quickly I figured out how to use it! Perhaps due to the tuning symmetry across the banjo, everything felt so instinctive; the low notes I needed just fell right under my fingers on the 5th/bass string. I've yet to try a 6 string banjo in A (aAEAC#E), A modal (aAEADE), Old G (gGDGDE), or Open C (gGCGCE) equivalents, but I can already see the possibilities! I definitely wanted one in my collection.....and soon! Why convert El Hefe? While I could simply buy a purpose-built 6 string banjo (Gold Tone has discontinued their model but you can still find them used....), I've got several reasons for converting El Hefe instead. First off, with a 3.5" deep 12" pot capped with a white ladye tone ring, El Hefe puts out some massive bass. I really think that the low notes of an added bass string will really boom out of that setup. Secondly, since I built El Hefe, I've got no qualms about taking a drill/saw etc. to it (you may remember that I have a "no saws etc." rule for my Buckeye); I am also comfortable saying that I've got the skills/experience necessary to make the necessary mods, which I'll outline later. Finally, I've struggled to figure out separate roles for my two irreplaceable banjos, both of which have 12" deep-pot construction. From this perspective, turning El Hefe into a 6 string is a much better option - buying another banjo would only make the problem worse! I don't doubt that I'll often want the simplicity of a 5 string, so the Buckeye is definitely in no danger of collecting dust either. After all that....how am I going to do this?? Believe it or not, I don't think it will actually be that hard or expensive! The biggest things I've got to do are as follows: 1) add another tuner to the headstock; 2) Get a 6 string bridge; 3) reconfigure/add slots to the nut; 4) Get a 6 string tailpiece. I'll go through the details of each of these steps below: 1) Add another tuner to the Headstock To add another "long string" to my banjo, I'll obviously need to add another tuner to the headstock. Since I built this banjo at a workshop with the Pisgah guys, we used Balsam banjo works hardware (Balsam banjo works is Pisgah's sister company; www.balsambanjoworks.com). I am able to buy a single matching tuner from those guys for ~$20....and its in the mail : ) As for where to put this thing: most of the 6 string banjos I've seen have the extra tuner right in the center, which is likely what I'll do as well: 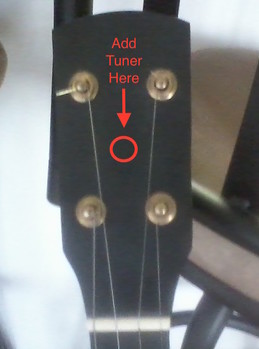 El Hefe's current headstock with indications for where the new tuner will go. The first 4 tuners were installed with a drill press to allow for drilling straight holes. I'm still in search of one I can "borrow" in the area, and I may have to buy an appropriate drill bit as well. If I can't find a drill press, I suppose I could try going free-hand with my hand drill. If this sounds sketchy, keep in mind that this is actually the way we drilled the hole in the base of the neck to attach the dowel stick as well. Theres a chance that I may simply take the banjo to Elderly and have the repair department to install the new tuner as well. 2) Get a 6 string bridge Believe it or not this part is already done! I contacted a guy on Banjohangout asking for some dimensions of his Buckeye (!!) 6 string (banjo 166, which you can see on Greg's site here) - specifically I was asking about string spacing at the nut and bridge. He generously offered to send me a spare 6 string Buckeye bridge for my "project" and wouldnt take a dime for it! Its always nice to come across generosity out in the world and I've noticed theres a lot of it in the Old Time community : ) I've placed the bridge on El Hefe in the picture below (I just diverted the current strings to fill slots 1,2,3,5 and 6 on the bridge): 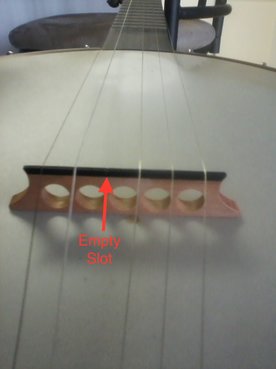 El Hefe with a snazzy new 6 string Buckeye bridge in place; the bridge was generously donated by a fellow 6 string enthusiast from Banjohangout! The bridge is centered to the best of my ability and all the strings still sit comfortably over the neck! I've got pics below of where the strings lie above the 5th and 12th frets:
Pictures of where the strings lie above the 5th fret (left) and 12th fret (right) with the 6 string bridge placed on El Hefe. Note that the 4th string position is not filled on the bridge, which explains the strange string spacing in both photos. The most important thing to note above is that neither the 1st or 5th (future 6th) strings fall off the edge of the neck; Though the 1st string appears pretty close to the edge at the 12th fret I can actually fret it all the way up the neck without losing it off the side (and I rarely venture above the 7th fret anyhow...). If this wasn't the case, I'd likely have to get a bridge with thinner spacing, which might be a bit uncomfortable from a playability standpoint. The width of El Hefe's neck is one of the big reasons that I thought this project might work to begin with. 3) Reconfigure/add slots to the nut: In the end I'll need a nut with 5 slots instead of the current 4. I thought about ditching the current nut and making an entirely new one, but it seemed easy enough to simply carve new slots alongside the existing ones, saving both time and money. I really don't care that there will be "extra" slots that reveal El Hefe's 5 string past : ) Here's the nut as it currently looks: 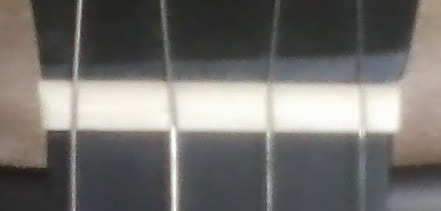 El Hefe's current nut with 4 slots for the 4 "long" strings of a 5 string banjo. The only question is where to cut the new slots. My plan is to use the current 1st and 4th string slots for the future 1st and 5th strings and cut 3 additional equidistant slots in between. I was initially worried that the end product would be a bit "crowded" but the kind soul that sent me the bridge told me that the distance between the 1st and 5th strings on his instruments is 1& 3/16", which is exactly where the 1st and 4th strings land on El Hefe currently. This is actually wider than the spacing on my electric guitar, which I can play comfortably, so I figured I wouldn't mess with success. The new strings will end up arranged as follows:  Diagram of where the 5 "long" strings in the 6 string configuration of El Hefe will end up sitting (in red). Note that I'll leave the "outer slots" where they are and cut new slots for the middle three strings. I've got a $10 set of nut files in the mail; these were designed for guitar work and look quite cheap, but I hope that they'll work at least long enough to cut these new slots : )
4) Get a 6 string tailpiece I know that these are available (obviously they're used on banjitars) but I may see if I can get away with doubling-up on the center loop of my 5 string tailpiece for now. I just like the current brass tailpiece and this would also save me a bit of money : ) Final thoughts Once again, all of the necessary tools are on order, and I really hope to get this done quite soon! The biggest pain will be drilling the hole for the new tuner since I'll likely have to remove the other tuners to do this right. My aforementioned bridge-donor buddy tells me he uses strings of the following gauges for his 6 strings: (10.5, 12, 15, 26, 40, 10). For the most part, I use slightly lighter strings on my banjos (5 string configuration: 9.5, 11, 15, 21, 10) so I'll likely pick something a bit lighter for the new 5th string (maybe in the 32-36 range?) when I get things set. With the new tuner, the new bass string, the new nut files, the new drill bit, and a free bridge (thanks again!)....I should be able to do this whole thing for under $40! Can't wait to get this done and share some pics/audio of the results - stay tuned!
I've always been a bit of a tinkerer when it comes to my banjos and since my first banjo building experience last year (here), I've gotten even bolder in that department. However, when tinkering with my Buckeye, I have a hard and fast rule...no saws or drills touch the banjo - anything reversible I can do without these tools is fair game : ). Believe it or not, that still leaves me a lot of options when it comes to tweaking both tone and playability. For instance, you can really change the sound of a banjo by trying out different string gauges, bridges, tailpieces, head types, and head tension (more on that here); I've experimented with all of these things on the Buckeye. A couple weeks back I had a crazy idea: what if I added a second tone ring? Well, I've done it.......and I can't wait to show off the results!
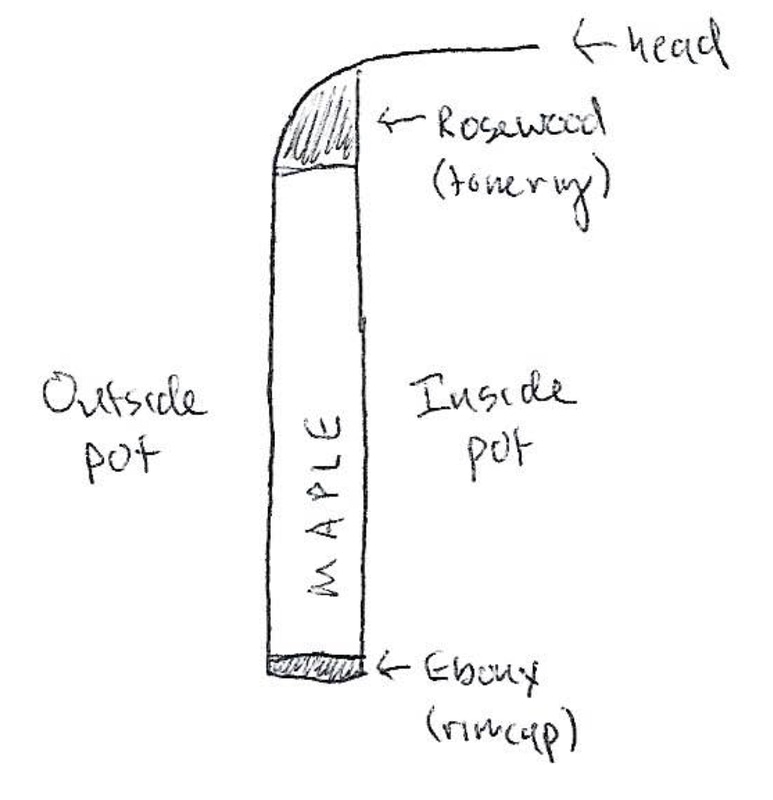
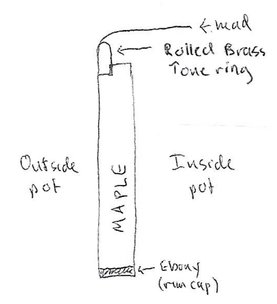
If you've read my previous post on my Buckeye (here), you may remember that it has already gone through a couple different phases in the tone ring department; the banjo originally came with a rosewood tone ring (we'll call this "Phase 1"), which was later replaced with a rolled brass tone hoop ("Phase 2"). I've drawn cross-sections of Phase 1 and Phase 2 below:
Figure 1 - Buckeye cross-section with rosewood tone ring (a.k.a. "Phase 1" - left) and with Rolled Brass tone ring (a.k.a. "Phase 2" - right). Unfortunately all of the rosewood had to be removed to make room for the rolled brass ring.
As an aside - I typically use the phrase "tone ring" to describe a piece of metal on top of the banjo rim; if the head is resting on metal, I'd say the banjo has a tone ring; if its resting on wood, I'd normally say that it doesn't. However, gluing a piece of extremely dense wood (e.g. ebony, rosewood, or persimmon) to the top of the rim certainly is different than simply putting the head on an unadorned rim, and I've increasingly seen banjos with this configuration labelled as having "hardwood" tone rings (note: some people also call these "woodies"). Using this terminology, "Phase 1" of the buckeye had a "rosewood tone ring." Later, the whole rosewood layer was removed to make room for the "rolled brass tone ring" shown in "Phase 2."
Back to the tinkering: looking at the "Phase 2" picture on the right side of Figure 1, you can see that there is a little shelf of wood next to the rolled brass tone ring upon which I thought a second tone ring could sit without any modification to the rim; once again, no saws necessary : ). I decided that a "round brass" (rather than "rolled brass") tone ring of the right diameter would be just the ticket. As a bit of clarification: the terms "rolled brass" and "round brass" describe slightly different brass tone rings, the cross-sections of which I've shown below. 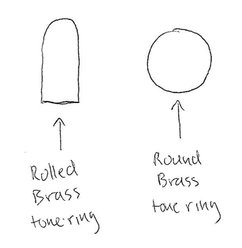
Figure 2 - Cross-sections of rolled brass and round brass tone rings. Note that these terms are those used by musical instrument parts supplier, Stewart MacDonald, from who I bought both of these tone rings. I have no idea if these terms are universally used by Banjo builders.
As you can see, a "round brass" tone ring is exactly what it sounds like (i.e. it has a round cross section). Round brass tone rings typically sit right on top of a flattened off banjo rim and are held in place with head tension (however, Jason Romero cuts a slot for round rod tone rings in the "Belle Rose" configuration of his banjos and other builders may do this as well). "Rolled brass" tone rings, which are flat on the bottom and rounded off on top, are inset into the rim by cutting a slot towards the outside edge (e.g. "Phase 2" in Figure 1). My goal was to find a rolled brass ring of just the right diameter to accomplish what's shown in Figure 3 (below):
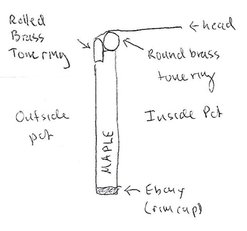
Figure 3 - Hypothetical (okay, not anymore) cross-section of "Phase 3" for the tone ring configuration of my Buckeye, accomplished by adding a Round Brass ring, which is held in place by head tension without any modification to the rim as it existed in "Phase 2."
My goal here was to have the round brass ring stick out just a little bit above the rolled brass ring so that the head actually rests on top of it (I tried to illustrate this in Figure 3). This is the same kind of principle behind the "archtop" tone ring design the bluegrass guys use (note: I think legendary Old Time banjo builder Kyle Creed actually made a few archtops as well). Once again, finding the right diameter round brass ring was key; if the diameter was too small, the head wouldn't actually touch the new tone ring (i.e. no "archtop" effect); if the ring was too big, it may not rest on the shelf on the rim as I'd hoped. Furthermore, I realized that the added height would raise the head slightly and I didn't want to go overboard on this for fear that I wouldn't have a bridge low enough to compensate.
Also, rather than buying straight-stock brass at a hardware store and bending my own tone ring by hand (...which I would likely do a poor job of...), or buying a ring roller, I decided to get a pre-bent purpose-built tone ring from a supplier. As mentioned above, I ended up buying a round brass tone ring from Stewart-Macdonald (www.stewmac.com); the diameter of the brass rod is listed as 0.275", which was perfect for my needs. The tone-ring came as an un-broken loop with a 12" diameter, and I used a hacksaw to take out just enough material for it to tightly fit inside the original rolled brass ring. To be sure, this ended up as a really tight fit: I don't think theres a bit of air between the rolled brass and round brass tone rings. The folks on banjo hangout (www.banjohangout.com) say that there is no need to seal the ends of the tone ring back together before installing, which is a good thing because I had no way to do this; once I got the ring sitting in there, I put the head back on and got back to pickin'! I took some pics of the final product, which I've included below: 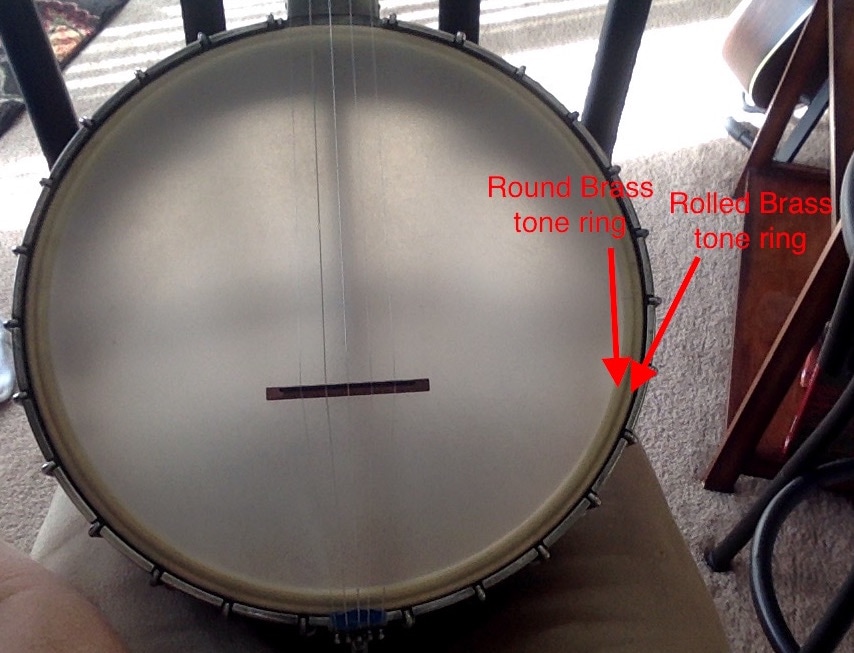
Pic 1 - closeup of the front of my Buckeye, with the rolled brass tone ring (installed by Greg) and the round brass tone ring (installed by me) labelled; you should be able to make them both out beneath the translucent Renaissance head.
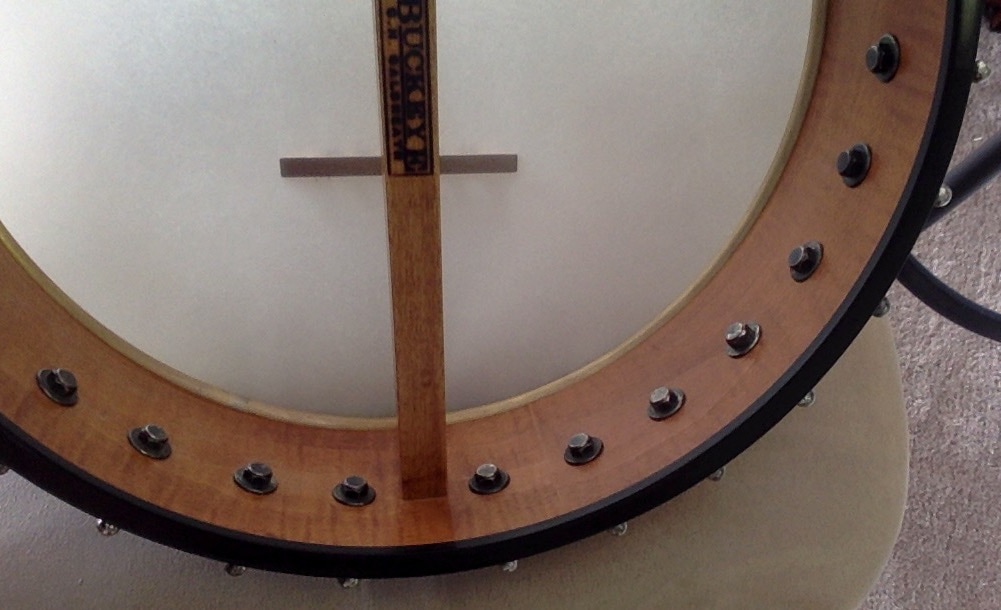
Pic 2 - A picture of the underside of the banjo in which you can just make out
the rolled brass tone ring protruding out from its "shelf." 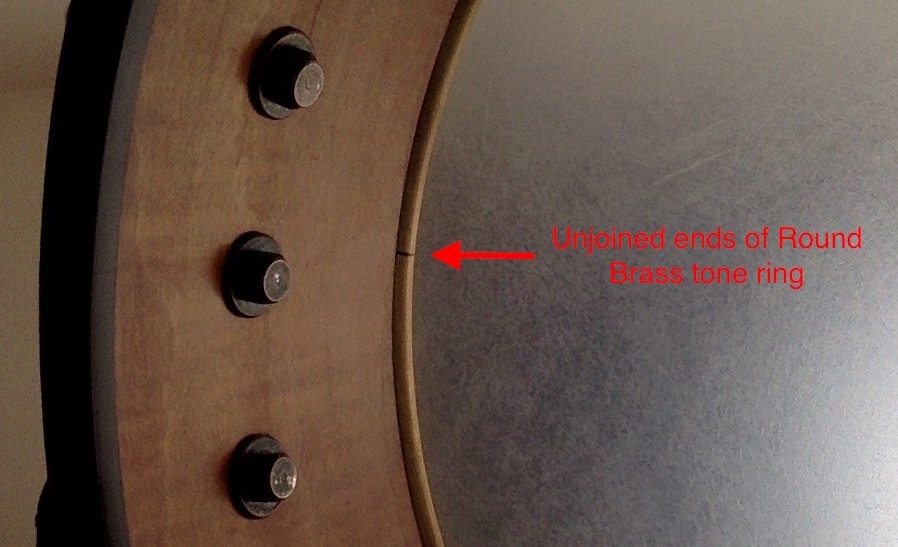
Pic 3 - Another "underside of the banjo" pic where you can clearly see
the unjoined ends of the newly-added rolled brass tone ring.
Well, you've seen the results of the tone ring addition, but how does it sound? In short, by reducing the vibrating area of the head and adding a bit more mass to the pot, I've sacrificed a little bit of "prettiness" of the banjo played solo, for a bit more "cut" when the banjo is played with other instruments. Though the low end of the Buckeye used to fill the room when played alone or with a fiddle, these "round" notes were kind of lost amongst fiddles and guitars; with the addition of the round brass tone ring, I can definitely hear the 4th string in the local jam (tried it out last week) and actually feel those notes rumbling my chest to boot! Overall a bit less delicate and a bit more aggressive.
I've got the head dialed in to 88 on my drum dial and I thought it would be fun to compare the current sound with the "88 drum dial" sound file of me playing "Spotted Pony" from my head tension post (again, here); note that the Buckeye was in the "Phase 2" configuration of tone rings when I recorded the first file.
Example 1 - Me playing "Spotted Pony" on the Buckeye in "Phase 2" of tone ring configurations.
Example 2 - Me playing "Spotted Pony" on the Buckeye in "Phase 3" of tone ring configurations.
I'll admit that this is not likely a fair comparison because I recorded the two files in different rooms and I have no idea what the settings on my Mic were the first time. However, we can pretend like any sound differences apparent between the two files are due to the tone rings : )
As an ending to this post, I'd like to say two things: 1) I owe a debt to the brave souls who added round brass tone rings to their Deering Goodtimes and posted their methods on banjo hangout; without those examples I never would have gotten the idea for this project, nor would I have been brave enough to go through with it! 2) For the record, I am very, very, very, happy with Greg Galbreath's work (for those who don't know, Greg is the mastermind behind Buckeye Banjos). Adding the tone ring is in no way critical of how he built the banjo to begin with - its just a bit of reversible-tinkering I did in my spare time. I've loved every "phase" of the banjo so far for different reasons - recently I wanted a bit more "cut"...but its entirely possible that I'll remove the "round brass" tone ring in the future to go back to where Greg last left off. If you'd like a custom banjo like mine, I would not hesitate to recommend getting a Buckeye! Thanks for reading! |
-----
|

 RSS Feed